12/31/11

The pH of Some Commonly Grown Plants Using Hydroponics

In the previous post I was asked about the best pH, well as usuall my answer is it depends on what you are growing.  Below are some nutrients that 'drop out' at various pH's and a few common plants I have grown indoors and their recomended pH growing hydroponically, the pH may need to be different if growing in soil or other mediums.  See my post on checking soil/soiless medium pH


pH values above 7.5 cause iron, manganese, copper, zinc and boron ions to be less available to plants.
pH values below 6 cause the solubility calcium and magnesium to drop.
pH values between 3 and 5 and temperatures above 26C encourage the development of fungal diseases.


Good Growing and

Happy New Year!

Plant     Optimal  pH Range
Beans        6.0-6.5
Broccoli   6.0-6.5
Cabbage   6.5-7.5
Carrots     5.8-6.4
Chives      6.0-6.5
Garlic      6.0-6.5
Lettuce     6.0-6.5
Onions     6.5-7.0
Peas         6.0-6.8
Pineapple 5.0-5.5
Radish     5.6.-7.0
Strawberries  5.6.-7.0
Tomatoes  5.5-6.5

12/27/11

E-mail - Best pH for 8 Site Clone Bucket

Hello Dr. Myers,
   I just bought the 8 site cloning bucket .  Can you please tell me what I should adjust the pH of my water to ? Also it came with a cloning gel and hormex... Which one should I use ? Thank you in advance for answering my questions.

 Thanks for the question. I have really enjoyed my 8 site clone bucket!!!  The pH of the nutrient/water solution, depending on the plants you are growing should be between 5.5 and 6.8. In most cases optimal pH is about 5.8 to 6.3 but this may vary slightly depending on the plant you are growing and the conditions you provide.
Some good growers get optimal results with pH as low as 5.0. I always encourage growers to experiment to see what works best for your grow environment and the particular plants but always keep the pH between 5.0 and 7.0.
You should measure the pH right after you add the nutrient solution to the reservoir (mix well first) because the nutrients will change the pH level of the water. Check the pH level a couple times a day the first time you use the clone bucket but once you know about where the pH will end up with your nutrients you only need to check it about once a week. I actually have not checked pH in awhile with my bucket, I simply change ALL the water each Friday and I use the same fertilizer and have great growth so I know that the pH is good. If this is your first hydroponic growing experience, you will need to check it often to see if you need to adjust your pH.  Different nutrients will have different affects on pH and water from different areas will have a different pH so you may need to adjust your pH each week or maybe you will be lucky like me and not have to.
I like hormex, I have written about it on the blog, but since you have 8 clone sites try both on four different plants a few times and see which one works better for you. I’d enjoy hearing back your results!
I will be writing about pH on the blog in Jan. Thanks to your good question.
Good Growing,
Dr. E.R. Myers

12/17/11

Growing Ghost Peppers


I have published a test on beneficial bacteria using ghost peppers. These are one of the hottest peppers in the world (they were the hottest in 2007, but have been surpassed by other peppers since then). They are hotter than jalapeƱo and hotter than habaneras. I used latex gloves when handling the seeds since the hottest part of peppers is the part where the seeds are. It is possible that the ‘hotness’ evolved as a defense mechanism so that animals did not eat the seeds but only the flesh. Or, like many crops the ‘hotness’ could be do to breeding.

The “hotness” is from a substance called capsaicin. There are capsaicin glands near the seeds, usually at the top of the pepper. The placenta is the part where the seed attaches to the pepper pod. In most peppers the number of capsaicin glands are higher toward the end with the stem (The stem is called a peduncle) so if you are ever in a challenge, go first, take a bite by the tip (the tip is called the apex) and let the next guy take a bite closer to the peduncle.

GHOST PEPPERS ARE NOT SOLD IN STORES BECAUSE THEY CAN CAUSE PHYSICAL HARM DO NOT JOKE OR PLAY AROUND WITH THESE PEPPERS! A friend of mine took a little nibble of the apex and his nose and mouth turned red and burned for hours.

The name ghost pepper is actually due to English speakers mispronouncing and/or misspelling its name. Another name for this pepper is Bhut jolokia (they are from India) The name is based on the region it is from, but if you spell it wrong it is translated as ghost.

Good Growing
Dr. E.R. Myers
 

12/10/11

E-mail - MH vs HPS Flowering and Vegetative Growth

Dr. Myers
I recently purchased a 1000w digital system from HTG (http://htgsupply.com/Product-Digital-Greenhouse-1000-watt-HPS-Grow-Light.asp)
I thought I grew with HPS and flowered with MH.(they state that on another web page) I called HTGSupply.com and they say it is just the opposite.
Which is correct?
Also, there are several versions of MH that work with my system an MH 6500K (sounds like a grow bulb to me) an MH Neutral, MH Warm,MH Cool.
What MH bulb should I use and when should I be using them...Thank You very much.

Thanks for your question, it is important to know!  Let me  try to clear this up...
You grow with MH during vegetative because it has more blue light which promotes vegetative growth. You use an HPS for flowering 1) because it has more yellow light which encourages flowers/fruit and 2) the excess yellow will also cause plants to grow tall and without wind or shaking some plants get lanky and fall over. Plants naturally have slow then no vegetative growth when then flower so this is not such a problem when using the HPS during flowering
If I may quote the HTGSupply.com website, good growers worldwide agree that growing with Metal Halide during the vegetative stage, then switching to High Pressure Sodium for flowering is the way to grow the BEST PLANTS POSSIBLE. This method gives you the thickest, most lush plant and the best yields!


I talked about Kelvin before on the blog (LINK to Kelvin post)
You are right the 6500 K would be for vegetative growth, and it would be the one I would recomend you use for vegetative (It could be used for flowering too). However, for the light you bought, the idea / benefit is the you can use the MH for vegetative and then switch the bulb over to the HPS when you flower, HPS is usually around 2200 K.
Good Growing
Dr. E.R. Myers

12/1/11

E-mail -What you Need to Start Indoor Growing


Hi Doc,
I have decided to start growing indoors. I have read some of your posts, but can you tell me what is the most important thing when growing indoors. I know you need a light, and a medium but what should I start with, there is just so many choices and I want to start off with the best stuff.
Thanks

Hello, Thanks for your question. I will touch on this topic, but as you said there are a lot of choices, I encourage people to do experiments for themselves, to determine what is best for their plants in their grow environment. I also encourage people to do searches for topics on this blog, I have been writing for three years now. If you don’t find something, send me another E-mail and I will look into it. A lot of my posts are from questions like you ask.

I think you are in the right area, HTGSupply.com is certainly one of the best grow supply stores, and they have a great reputation for great products and great customer support. You should contacts Sales@htgsupply.com with questions about any equipment, and I answer questions about plant biology.

The most important thing when growing anything is genetics. (Please see my posts on Plant Breeding). If you don’t have good genetics, the environment you create really does not matter. Once you get good seeds or cuttings then the next most important thing is a good light. Light drives photosynthesis, which provides the energy for the plant to grow and flower, not the best light = not the best plants.

I also encourage first time growers to grow in soil. It is a very forgiving medium; it has some nutrients, and holds some water but allows for good drainage if it is mixed with things like sand, vermiculite, or perilite. If you are going to grow big plants, use 5 gallon buckets, but 2-3 gallon buckets will be ok for plants under 3 feet tall.

Once you have a good light from HTGSupply.com, you need to keep the temperature between 60 and 80F in your grow area. A spare closet would be a good grow area, but a grow tent will also allow you to grow indoors if you don’t have a spare closet.

That is my recommendations for now, once you get started please feel free to E-mail me any and all questions about plant biology.
Good Growing,
Dr. E. R. Myers

11/27/11

Using a Screen #2 - Increase Yields

I first was introduced to the idea of growing with a screen from an E-mail from a good grower that was looking to increase their yields.
I have previously talked about using a screen to grow in small spaces.  A friend of mine is doing this now so I'd like to add some comments.
First, I mentioned in the using a screen article that you should trim lower branches and leaves to avoid them becoming infected with mold.  This is still a good idea, but my friend has not had any problems with mold and she does not trim the branches.  She does remove all yellowing fan leaves.  She says light getting to the plants is more important than the nutrients that are left in the yellow leaf.  I still say it is not a bad idea and you could use these lower branches for cloning.  The advantage to using these lower branches for cloning is you can pick the plants that are doing the best or have the best characteristecs (growth habit, color, taste etc.) 
Second, I recomended using chicken wire or small holed fencing in my first article.  My friend really likes the fencing where there are square 3x4 inch holes.  She said the chicken wire holes were too small, it was hard to get the stems through the wire when they had big fan leaves, and it was easier to train the brances with the larger holed fence.  She does not even use tie wire etc.  She simply keeps the plants growing along the screen until the plants really start to flower, then the plants stop their vertical growth.

I welcome any other commets about growing with a screen,
Good Growing,
Dr. E. R. Myers

11/20/11

E-mail - Hydroponics Set Up - List of Needed Materials

Hey Doc,
  This is my first time working with hydroponics, are there any specific chemicals that are required to start off with? A list perhaps? Thank you for your time...
Hello,
   Thanks for your E-mail.   I too am just getting into hydroponics, I have been and will be a dirt grower but like with LED's  I am expanding my growing ability thanks to good growers like yourself asking questions.
I have had great success with the bubble boy  products from HTGSupply.com.  The picture below is the proof.
I will start a list, and continue to talk about hydropoinics in the coming posts...
You don't really need any special chemicals, but you will need to monitoer the pH and add the right nutrients to you plant/ the water.
You need a good hydropoinics system, the water needs to be airated or circulated well to oxygenate the water.  I almost never recomend first time growers start off with hydropoincs, soil is much easier and forgiving to grow in.
You need a medium for the roots to grow through.
You will need a pH meter too, the problem with hydropoincs is that if you don't monitor the pH the water can get to an extreme pH and nutrients won't be available to the plants no matter what and how much fertilizer you use.  I change the water completely every week no matter what the pH to avoid nutrient lock up etc.   
You need  fertilizer(s) too.  Unlike with soil growing you must provide ALL the nutrients to the plant ALL the time.  This can mean maximum growth if you know what you are doing, but can mean dead or sickly plants if you don't.  Most hydropoinic fertilizers come with instructions on how much to use, follow the instructions.

That is all I have been using and you can see with the 90 watt LED UFO I have gotten great flowering.
More to come on hydropioncs,
Good Growing
Dr. E. R. Myers

11/12/11

Seed Germination in a Plastic Bag

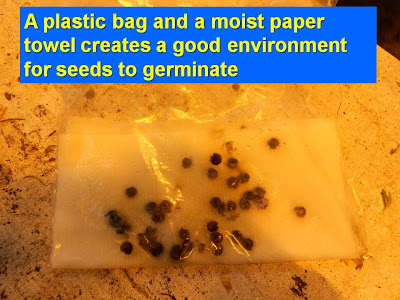
While I would not recommend this method for small seeds (they should be put directly in the grow medium) a cheap and easy way to germinate seeds is with a plastic sandwhich bag and a paper towel. This allows the grower to see which seeds germinate and then put a germinated seed in a pot. This is a good way to conserve space if growing in a small space.  If you can only have a specific number of pots you can start a few more seeds than the number of pots you havea in a bag and put the first seeds to germinate in the pots.  I used to keep track of the percentage of seeds that germinated when I had a lot of seeds and stored them (Seed Storage LINK) for long periods of time. After seeds are stored for more than a year less and less will germinate.  After 5 years I have very few seeds germinate.


If you are going to use this method, you want to make sure NOT to over water the paper towel. If you can ring water out of it, it is too wet. You can always add a few drops in a day or two if it gets too dry. Do not let the paper towel become total dry either.  You should open up bag at least every day to check moisture and to look for seeds that have germinated, (Do you see the germinated seed in the bag below?) I used to use a small object to keep the bag open so the top of the bag did not actually touch the seeds.

Another potential problem is that the roots may grow into the paper towel. If this happens do NOT pull the seed out. The most important part of roots are small little projections called root hairs. These hairs are where water and nutrients are taken in. If you pull the plant out of the towel you could damage the fragile root haris and at such a young age this could kill the plant. The pape towel is what should be torn and then just plant it right along with the plant. It will break down and obviously plant roots can grow right through it.

Good Growing,
Dr. E.R. Myers

11/3/11

E-mail - Soil Gnats, Sand and Nutrients

Hi Doc,
   My question concerns a method i used hastly to get rid of fungus gnats. have already been using azamax with minimal results for awhile. yesterday i got foxfarms dont bug me and sprayed the crap out of the top of soil and the sides and bottoms of the pot. i also put about an inch layer of play sand on the top so they wont want to come back. This seems to be working pretty good actually but what should i do about feeding. I use house and gardens soil an b line. Will the sand filter out my nutrients??

Thanks for your question.   You can check out a previous post on soil grant remedies.
No, the sand should not affect nutrients if it is play sand. Some sands have calcium or other minerals that might alter your fertilizer uptake. I used Perilite for the same purpose. You have the right idea, you want to keep the gnats away from their food source and breeding area, damp soil. Try to let the top of the soil/sand in your container dry out 100% before watering again. The more dry the soil the less successful the gnats will be.


One other thing to consider is watering from the bottom. If you are able to, water your plants from the bottom for a week or so in order for the top of the containers to remain dry. Be mindful that your little friends the soil gnats might also figure out they can get to soil from the bottom too. I grew in 5 gallon buckets with lids for trays and it was not possible for the gnats to get to the 3-5 holes I had drilled in the bottom of the buckets for water drainage. I put several inches of perilite on top of the soil after I watered the plants with water I soaked a few cigars (philly blunts) in for a couple days. Nicotine is a natural organic insecticide. You could try that too if you like. I watered the plants with normal fertilizer, then used the nicotine water to just get the top of the soil saturated, I did not want the nicotine to go all the way through the soil, just to stay on top where the gnats are.
Good Growing,
Dr. E.R. Myers

10/22/11

Nutrient Basics - Cobalt


Cobalt is needed by all animals in trace amounts.Cobalt is a component of vitamin B12 which is essential to most animals and possibly plants
    Studies indicate cobalt is essential to many beneficial bacteria that are involved in nitrogen fixation both in legumes and non-legumes. From what I read, the cobalt is actually being used by the beneficial bacteria and the use in plants is still unknown. I would recommend having cobalt in a fertilizer if you are going to use beneficial bacteria of any type.  There is still a lot of unknowns about cobalt.
 Cobalt is needed in VERY small amounts.  It is toxic to people in large amounts, a few grams will kill a 200 pound person so do NOT search out large quantities.  You should not touch cobalt with your bare hands.  It was used to settle beer foam in Canada a few years ago and it lead to heart problems.

Good Growing,
Dr. E.R. Myers

10/16/11

Nutrient Basics - Molybdenum

Molybdenum


As I wrap up my nutrient basics series of articles I want to suggest to the good growers that molybdenum and the next post on cobalt are two nutrients that may benefit the beneficial organsims as much or more than the plant it self. Molybdenum is proven to benefit symbiotic nitrogen fixation and it is used by plants for protein synthesis.

Molybdenum deficiencies show up as leaves of young plants are chloritic, leaf margins yellow and curl. Older leaves become abnormally large, while young leaves remain very small You may also notice interveinal chlorosis which occurs first on older leaves, then progresses to the entire plant. Molybdenum deficiencies frequently resemble nitrogen deficiencies, with older leaves chlorotic with rolled/curled margins and stunted growth. If you are adding a high nitrogen fertilizer during vegetative growth you should look for twisted younger leaves which eventually die which means it is molybdenum and not nitrogen..

Casues are usually due to pH, often with acidic soils (soils with a pH of 5.2 and below). An excess of sulfur or copper can also cause a molybdenum deficiency.

Molybdenum toxicity will cause a discoloration of leaves depending on plant species. This condition is rare but could occur. You will notice it right away after adding a fertilizer that is high in molybdenum. Since it is used by the plant in very small quantities, I would not recommend adding it. I say this not just to avoid harming your plant, there may be health effects from consumption of high amounts of molybdenum so if you are not 100% sure you have a deficiency, don’t worry about it.
Good Growing,
Dr. E.R. Myers

10/7/11

E-mail- Brown leaf tips

I have noticed the tips of my leaves have brown tips.  What does this mean and if it is a problem how can I fix it?

Thanks for your question.
Browning of leaf tips or leaf margins (leaf edges are called margins) can be caused by a few different things. The first thing I would guess being an indoor gardener is a lack of humidity. If you don’t have one, you should think about getting a thermometer with a min/max setting for temperature and humidity. I have one that takes the humidity reading on a remote wire. I like this because you can put the sensor by your plant tops near the light to be sure the temperature and humidity are in their optimal range by the plant tops, and then you can put the base by your plant pots/floor to see what the humidity and temperature are down there. If you use an HPS or MH these bulbs generate a lot of heat (which can also cause leaf tips to burn) and also reduce humidity. This low humidity can be good as low humidity is bad for spider mites (LINK) and fungal disease, but also not the best situation for your plants. If you do have low humidity (30% or less) I think this may be something (brown leaf tips) you may want to live with. You can mist your plants, have the pots sit in trays with stones and standing water and water you plants a bit more often, but all these can have negative side effects. If the brown tips do not get worst, or you do not see other leaf discoloration the best thing might be to do nothing.

Brown leaf tips and brown along the margins can also be a sign of fertilizer burn and/or poor water quality. If you are using more than the recommended amount of fertilizer the brown tips are a sign you should not add more or reduce the amount of fertilizer. If your water has high amounts of chlorine or chloramines you could consider a water filter. Lastly, if you are using an insecticidal soap this may cause brown leaf tips.
Please feel free to send me any more questions if you have them.
Good Growing,
Dr. E.R. Myers

10/1/11

Nutrient Basics - Copper

Copper is part of many plant enzymes so it is essential for plants to have trace amounts of this nutrient.


Copper deficiencies appear in young leaves in a unique way, leaf centers yellow while veins and leaf margins remain green for a while. Shoots tips die, which is seen as leaves fail to develop. If they do grow, young leaves often become dark green and twisted. They may die back or just exhibit necrotic spots. Overall growth and yield will be deficient as well.

Causes of copper deficiencies are usually due to pH, plants grown in peat soils or given too much lime. Excess phosphorus, zinc or nitrogen can also cause a copper deficiency

As with any nutrient, copper toxicity is possible. Good Growers know copper is required only in very small amounts and readily becomes toxic in solution. Excess values will induce iron deficiency. Root growth will be stunted showing reduced branching, abnormal darkening and thickening of roots.

Good Growing,
Dr. E.R. Myers

9/21/11

Beneficial Microrgansim - Links to Products

I began talking about beneficial bacteria and fungi thanks to a question from a reader (Link to beneficals E-mail).  You should also read posts on the rhizosphere if you are interested in this topic


I will be talking about and doing some tests on beneficial microorgansims in the coming weeks.  Thanks to Perry the shipping manager at HTGSupply.com for sending me the links to all the beneficial microorgansim products that are carried by HTGSupply.com.  I will be linking to this site a lot and I encourage any and all of you to let me know if you have tried these, and if you compare the products let me know the results, I enjoy hearing from you.

Good Growing,
Dr. E.R. Myers

Advanced Nutrrients:
http://www.htgsupply.com/Product-Advanced-Nutrients-Piranha-Powder.asp
http://www.htgsupply.com/Product-Advanced-Nutrients-Tarantula.asp
http://www.htgsupply.com/Product-Advanced-Nutrients-Voodoo-Juice.asp

Foxfarm:
http://www.htgsupply.com/Product-FoxFarm-Bushdoctor-Kangaroots.asp
http://www.htgsupply.com/Product-FoxFarm-Bushdoctor-Microbe-Brewe.asp

Aurora (ROOTS organic):
http://www.htgsupply.com/Product-Oregonism-XL-Endo-Ecto-Mycorrhizae.asp


General Organics:
http://www.htgsupply.com/Product-Bio-Root.asp

House and Garden:
http://www.htgsupply.com/Product-House-&-Garden-Root-Excelurator.asp

Humboldt Nutrients:
http://www.htgsupply.com/Product-Humboldt-Nutrients-Humboldt-Roots.asp
http://www.htgsupply.com/Product-Humboldt-Nutrients---Myco-Madness-Solule.asp
http://www.htgsupply.com/Product-Humboldt-Nutrients---Myco-Maximum-Granular.asp
http://www.htgsupply.com/Product-Humboldt-Nutrients-Big-Up-Powder.asp
http://www.htgsupply.com/Product-Humboldt-Nutrients-Mayan-MicroZyme.asp


9/17/11

E-mail - What is Beneficial Bacteria?

Hi Dr. I'm new to growing but have reading lots of material because this new found hobby is becoming an obsession. Through some of my reads I usually find something about what is called beneficial bacteria. This has been of interest to me ever since I've first encountered it.

What can you tell me about these beneficials and are they necessary too maintain a beautiful garden with great yields? If so is there any productyou can recommend?
Thanks for your time Doc.

If you are interested in this topic, be sure to read my post on the rhizosphere next.
I also suggest you read my post about how to use beneficial organisms products

Thanks for your question. I think we all have a passion for growing. Most organisms in the world, maybe all, depend on other organisms to survive. Various plant, bacteria and fungus species have evolved beneficial relationships with each other especially in the soil.. For example, fungal species have small root like projections called hypahae that can absorb nutrients out of the soil more efficiently than a plant root. However, plants due to photosynthesis can acquire sugars easier than a fungus can absorb it. So, over time several type of fungal and plant species have created a mutualistic relationship where the plants give the fungus sugar to eat, and the fungus helps the plant get nutrients out of the soil more efficiently. In fact, 90 percent of all plant species have a relationship with one or more fungi which is termed mycorrhizal (Greek for fungus roots plural form is mycorrhizae). Evidence of this relationship with plants has been seen in fossil records from over 350 million years ago. There must be a benefit for something to persisit so long.

Maybe the best example of a mutualistic relationship between fungus and plants is with orchids. A lot of people like to grow orchids, but it is not easy to do. Many orchids need to have a specific species of fungus in the soil/medium where the seeds germinate and around the roots in order to germinate and grow. If an orchid breeder does not have the correct fungus (Mycorrhizae) than the orchid seeds will not survive to adulthood no matter how optimal the environment is. Orchids are very particular plants; most plants can grow fine without mycorrhizae if you make sure the pH is in the right range and you provide all nutrients in the optimal amounts in the fertilizer… I may be lazy but I would rather let the bacterial and fungus do the work with the plant roots…

Adding beneficial microorganisms may be a very important way to provide optimal nutrients with organic growing. With organic gardening you want to create an environment in the soil/medium where your plant and other organisms interact to get optimal results. I once convinced a friend to use, bat and sea bird guano to help him grow better. A week later I saw him and he came right up to me and got in my face, “My buddy said that stuff you gave me will get bacteria growing in my pots!”
I laughed and said, “I bet it will”
He seemed shocked, expecting me to deny it, or defend against his verbal onslaught. I explained that when growing organically, you want to cultivate bacteria in the soil. Bacteria are important in recycling and supplying nutrients to plants. There are thousands of beneficial bacteria species, some types of bacteria fix elements such as nitrogen, while the plants supply the bacteria with sugar (food) and a place to live. Many plants in the legume or bean family have little nodules (bumps) on their roots that provide a place to live for the bacteria. The bacteria get room and board and their waste product is nitrogen, which is usually the most limiting nutrient to plant growth. Something outdoor growers might want to know is that for centuries many cultures of people have planted legumes like beans, peas, clover, alfalfa etc. in their fields after harvesting their crops to add organic nitrogen for next years crops. If you later till (mix) the plants into the soil, that is called a green manure and will add nitrogen and organic matter to the soil, a great way to build up the soil for most plants. You could throw some clover or alfalfa seeds down after you harvest your plants and them mix those plants into the ground in the spring before you plant your crop.

Bacteria are also important to plant growth because when bacteria find organic material to digest they secrete enzymes to dissolve whatever it is they are metabolizing. These enzymes benefit plants by making nutrients available that without the bacteria would not be. Lastly, bacteria can also be used to fight off insect attack. The only organic insecticide called BT is actually derived from a bacterium named Bacillus thurengiensis, a close relative to anthrax. This bacteria makes an insecticide that is widely used as an organic insecticide. Not only that but the gene that makes this insecticide has been inserted into most crop species so that the plants make the insecticide themselves, and don’t need to be sprayed with petrochemicals during the growing season.

I have written more about beneficial bacteria(LINK to post with products that have beneficials) and will be testing some products such as roots organics by Auroa to see how these beneficial microorganism help plant growth, stay tuned…

Good Growing,
Dr. E.R. Myers

9/12/11

Nutrient Basics - Boron

Boron has biochemical functions that are not yet fully determined It is involved with root, fruit and seed formation andevidence suggests it is involved in the synthesis of one of the bases for the nucleic acid (RNA uracil) formation.


A Boron deficiency will have plants that exhibit corky spots on fruit. Rust-coloured cracks develop in stems and leafstalks, which later develop a corky edge. Leaves become thick, leathery, discoloured. Plants fail to bloom. One of the earliest symptoms is failure of root tips to elongate normally which would be obvious to hydroponic growers more so than soil growers. Root tips often become swollen and discolored.

Soils high in calcium or potassium can lead to boron deficiencies.

Boron Toxicity will result in yellowing of leaf tips followed by necrosis of the leaves beginning at tips or margins and progressing inward eventually leaves die and prematurely fall off. Some plant species are especially sensitive to boron accumulation.

Good Growing,
Dr E.R. Myers

9/5/11

E-mail - Nutrient Deficiency and other aeroponic problems

Hello Doc,
My plants have purple on the stems and in the veins of the leafs  but just at he top -- also the plant is wilting hanging down what can I do to fix this?  I'm using a aerogarden and they have been known to cause stem rot I got stem rot on all plants so I added dirt around the stem past the rot and I also have been turning the pump off to keep the soil moist will this stem rot go away will the plant root up to where I burried it to?

 
You have a few problems my friend. The purple may be due to phosphorus deficiencies, do your plants exhibit slow growth with weak and stunted plants? Is the purple pigmentation in older leaves and stems? On the other hand, excess potassium can aggravate the uptake of magnesium, manganese, zinc and iron and effect the availability of calcium and can lead to purple coloration in some plants. Only you know if you are giving too much potasium or not enough phosphorus. With non-soil growth the pH can get too high or low and make nutrients unavailable to plants even if you include them in your fertizer.  How often do you check the pH?

The wilting of plants is never good. Either the plants are getting too much water or not enough - in your case I’d say the plants are getting too much water, or really too little oxygen. Plant roots absorb water for the plant, but they also need access to oxygen, which most land plants can not get if the soil or medium is always saturated with water. Reducing the time the water is on is a good idea, you want the roots to be wet but not drenched all the time.
Putting soil around the stem rot may be a bad idea. You want the stems to dry out. You may be keeping the stems wet by putting dirt around them! You need to increase air flow and try to keep the stems dry. Put a small fan on your plants and run the pump periodically, say for 1/2 hour every 2-3 hours.(or whatever the lowest setting is) This would allow the stems to dry and prevent rot. Is it possible for you to find a stem rot resistant variety to grow in your system for next time? Look into it.

Good Growing,
Dr. E.R. Myers

8/30/11

Nutrient Basics - Manganese

Manganese plays a structural role in the chloroplast membrane system, and also is important in numerous enzymes allowing them to work properly.


A manganese deficiency is difficult to diagnose since it resembles an iron deficiency. Yellowing (chlorosis) is most severe at the top of the plant. Yellowing of the leaves appears first near leaf margins and develops in a V-shaped pattern. Leaves then develop tan or gray spots that can easily be mistaken for air pollution damage. These spots are the major difference between manganese and iron deficiency.

Good growers know manganese gets locked out when the pH is too high, and when there's too much iron. Use chelated Mn if you have a deficiency.

Causes of manganese deficiencies are soils with a high pH (Alkaline), soils high in humus or peaty soils.

Manganese Toxicity appears as chlorosis, or blotchy leaf tissue due to insufficient chlorophyll synthesis. Growth rate will slow and vigor will decline.

Good Growing,
Dr. E.R. Myers

8/20/11

Nutrient Basics - Iron

Iron is an important component of some plant enzymes so while it is needed in small amounts, if it is deficinet you will not gave the best growth you can bet.

With an iron (Fe) deficiency like all movable nutrient deficiencies you will notice the change at the top of the plant as it works its way down. With an Iron deficiency look for the leaves to turn yellow but retain green veins. Shoots may die back and fruit may be discolored.

Causes of iron deficines are alkaline soil, (i.e. basic sols that are way above 7.0), applying too much phosphorus, over watering *The number one problem people have when E-mailing me*, excessive soluble salts, inadequate drainage. The good news, this is easily corrected by adding an iron supplement with the next watering.

Good growers know iron is unavailable to plants when the pH of the water or soil is too high. If iron appears to be deficient, lower the pH to about 6.5 (for rockwool, about 5.7), and check that you're not adding too much phosphorus, which as I said above can lock up iron. Use iron that's chelated for maximum availability. Read your fertilizer's ingredients - chelated iron might read something like "iron EDTA". Keep in mind too much iron without adding enough P can cause a P-deficiency.

You should also know that when adding iron to the solution, it is often necessary to not use fertilizer for that watering. Iron has a tendency of reacting with many of the components of fertilizer solutions, and will cause nutrient lockup to occur. Read the labels of both the iron supplement and the fertilizer you are using before you attempt to combine the two.

Iron Toxicity is rare but could cause brown spots on leaf surface.

Good Growing,
Dr. E.R. Myers

8/13/11

Nutrient Basics - Sulfur

Sulfur or sulfate is involved in protein synthesis. It is important in plant metabolism and involved with synthesis and breakdown of fatty acids.


A Sulfur deficiency looks like a nitrogen deficiency accept it shows up in the young leaves first. The young leaves will show yellowing of the entire leaf including veins but usually do not dry out. Also, you may notice the stems are weak. You may notice the leaf tips may yellow and curl downward. Some plants may show purple at the tips of the branches. Purple color is normal in some plant varieties but not usually just at the growing tip.

Causes of Sulfur deficiency are very wet or sandy soils or when soils contain an excess of nitrogen

As with any nutrient too much is just as bad as too little sulfur toxicity will show up with leaf size being reduced and overall growth will be stunted. You will also notice leaves yellowing or scorched at the edges. Excess sulfur may cause early senescence (when plants begin to die back for the winter)

Good Growing,
Dr. E.R. Myers

8/6/11

Nutrient Basics - Calcium

Calcium plays an important role at the cellular and molecular level in plants. This means it helps plant cells to function properly.

Symptoms of Calcium Deficiencies - first appear in new growth. Young leaves are affected first and become small and/or chlorotic (yellow or white to yellow) with irregular margins, spotting or necrotic areas. Chlorosis begins first at leaf edges then moves in. You may also notice young leaves become crinkled. Stem shoots stop growing and thicken and terminal buds become distorted. For indoor growers you should first rule out heat stress as a cause of the symptoms which has the same symptoms. You can tell if the problems are do to heat stress because this damage occurs only at the tops of the plants closest to the lamps. If you have a calcium deficiency the tips of all branches (not just the branches at the top of the plant by the light) will show symptoms. There's only one cure for heat stress problems...get the heat away from the plants, either by moving the lamps or moving the plants.

Causes of calcium deficiencies are acid soils/grow mediums, sandy soils. Soils that contain an excess of magnesium or potassium can cause calcium problems too. Temporary calcium problems may be due to drought or excess moisture but this should not be a problem indoors.

Good growers will look for calcium as a micronutrient in fertilizers; it is not in all fertilizers. Organic sources of calcium are eggshells. I put egg shells in my compost to ensure the compost has calcium in it. And. if you like seafood or live by the ocean you might have access to oyster shells. You can grind or break these up and soak them in water you plan to use to water your plants with.  You could even add some shell pieces to the hydroponic resevoir or soil.

Good Growing,
Dr. E.R. Myers

8/1/11

E-mail LED's and Clones/Cuttings

Hey I just placed a full order form you guys this morning and can’t wait till it gets here! I was wondering, can I use the 120w LED Starship during the cloning phase or should I use something else?.


Thanks,

I have posted on the blog about using LED’s for seedlings and flowering.   I have had good success with LED’s for, cloning, vegetative and flowering. One word of caution however, I have had quite a few people write about how the LED”s have burnt their plants. These people used the LED's incorrectly and had them a few inches above their plants.  See my post on light height. This ‘burnt plant’ problem is not due to heat but from light intensity actually. The LED’s from HTGSupply.com are so intense they can cause the plant pigments to become overwhelmed with light. This will stop photosynthesis and can destroy plant tissue. I would not recommend an LED be closer than one foot above plants and maybe even two feet depending on the plants you are growing. With clones, I would actually recommend keeping the LED three feet above the plants. I say this because with clones, you want a lower light source since they lack roots and an intense light will cause the cuts to use up water in their cells to do photosynthesis. With cuttings you want to have a warm, humid environment and a low light source to maximize success.

Good Growing,
Dr .E.R. Myers

7/26/11

Lower and Upper Leaf Symptoms (MOBILE NUTRIENTS) – Wrap up

Greetings,
I have listed below links to the posts that involve mobile elements. Mobile elements are more likely to exhibit visual deficiencies in the older leaves, because when these nutrients are limited they will be exported from the older leaves to the new growth. You will see the problems first on the lower leaves as the nutrients are moved to the newer fast growing leaves at the top of the plant.  So, when you see symptoms develop on lower leaves, read the posts for these nutrients and see if one is lacking.

Nitrogen

Phosphorus

Potassium

Magnesium

Zinc

The immobile elements tend to occur in new growth, since when they become limited, they will not be available to new growth. So, when you see symptoms develop on upper/new leaves, read the posts for these nutrients and see if one is lacking.

Manganese

Iron

Sulfur

Calcium


As always, E-mail me with any questions.
Good Growing,
Dr. E.R. Myers

7/21/11

Nutrient Basics -- Zinc

Zinc plays a roll in the same enzyme functions as manganese and magnesium. More than eighty enzymes contain zinc. Zinc participates in chlorophyll formation and helps prevent chlorophyll destruction. This means zinc deficiencies look similar to nitrogen deficiency with rolled leaf margin. Chlorosis shows up first in young leaves, which are also reduced in size. Zinc deficiency may also produce "rosetting"; the stem fails to elongate behind the growing tip, so that the terminal leaves become tightly bunched. Zinc deficiencies appear as chlorosis in the inter-veinal areas of new leaves Zinc deficiency produces "little leaf" in many species, especially woody ones; the younger leaves are distinctly smaller than normal

Zinc also gets locked out due to high pH. Zn, Fe, and Mn deficiencies often occur together, and are usually from a high pH. Don't overdo the micro-nutrients- lower the pH if that's the problem so the nutrients become available. Too much zinc is toxic. Foliar feed if the plant looks real bad. Use chelated zinc.

Zinc toxicity can occur when adding too much zinc and in soils excessively high in phosphates, nitrogen, calcium, or aluminium. Excess Zinc is extremely toxic and will cause rapid death. Excess zinc interferes with iron causing chlorosis from iron deficiency. Excess will cause sensitive plants to become chlorotic.

Good Growing,
Dr. E.R. Myers

7/16/11

Nutrient Basics -- Magnesium

Magnesium (Mg) is vital for photosynthesis since it is a part of the chlorophyll molecule. When you add Mg the plants will become a dark green. Magnesium is important also because it facilitates the use of nitrogen, phosphorus and sulfur. Also, Mg is needed in the formation of some plant proteins.

Signs of a Magnesium Deficiency -- For most plants a Mg deficiency first shows up in the lower leaves as discoloring in the veins. They first turn yellow, then orange and finally brown. Plant leaves will feel thin, brittle and sometimes cup upward.

Causes of a Magnesium Deficiency – soils that are too wet, (if growing in soil the top of the soil in the pot should be dry before watering.) Low pH (acidic) or soils high in peat or sand.  Moreover, soils given a high concentration of potash fertilizers or calcium can also show signs of an Mg deficiency. Mg can get locked-up by too much chlorine or ammonium nitrogen. Keep in mind you do not want to overdo Mg or you'll lock up other nutrients.

Cures for a Magnesium Deficiency -- Epsom salt is a cheap way to add Mg, using one table spoon per gallon once a month should suffice. Also, dolomite lime will add Mg, Calcium and keep the pH in a good range for most plant growth. When mixing up soil, use at least 2 teaspoon dolomite lime per gallon of soil. I use twice that personally.
For a quick correction of an Mg deficiency you can foliar fed the plants with ½ teaspoon/quart of Epsom salts (first dissolved in some hot water).
If your water is above 200 ppm, the hard water may lock out Mg with all of the calcium in the water. Either add a 1/4 teaspoon per gallon of Epsom salts or lime or invest in a water filter from HTGSupply.com (LINK to water filters).

Good Growing,
Dr. E.R. Myers

7/10/11

Nutrient Basics -- Potassium

Potassium (K) is important for the formation of flowers, fruit, and leaves. It also helps photosynthesis at low light levels and in internal water regulation. I have read it improves flavor in fruit, vegetables and flower color. Potassium is also linked to insect damage protection, disease and frost protection. Lack of potassium will reduce yield and quality.

Signs of a Potassium Deficiency --Older leaves are initially chlorotic becoming mottled or spotted, root systems are poorly developed and, fruit ripens unevenly. These symptoms will first apparent on the tips and margins (edges) of the leaves. Stem and branches may become weak and easily broken, the plant may also stretch. The plant will become susceptible to disease and toxicity. Also, a potassium deficiency will result in poor storage qualities (storage of herbs link)

Potassium can be limited in plants by too much sodium (Na) which displaces potassium, causing a deficiency. Sources of high salinity are: baking soda (sodium bicarbonate "pH-up"), too much manure, and the use of water-softening filters (which should not be used). If the problem is Na, flush the soil. K can get locked up from too much Ca or ammonium nitrogen, and possibly cold weather/ temperatures.

Organic sources of potassium are kelp or any seaweed and wood ash. Potassium toxicity is rare so make sure to give plants potassium in all stages of growth. I do not like to use fertilizers that lack potassium as the sole source of nutrients.

See my post on how potassium can affect pH

Good Growing,
Dr. E. R. Myers

7/4/11

Nutrient Basics - Phosphorus

Happy Independence Day!

Phosphorus (P) is also a vital nutrient for all plants that needs to be available to plants in all stages of growth. Phosphorus is the second number in fertilizers, so that a 5-15-5 fertilize would be 15% phosphorus. Specifically, phosphorus is crucial in root formation, flowering, fruiting and ripening. So, you should provide your plants with a fertilizer that has the middle number as the highest when you have seedlings, newly rooted cuttings, and from beginning to end during flowering/fruiting.

Signs of a Phosphorus Deficiency -- Early in the deficiency, plants look almost too healthy with what appears to be normal but undersized plants with dark green leaves. However, you may notice the leaves and or their veins and leaf stems (called petioles) frequently changing to purple, especially the undersides of leaves. Leaves may curl under with some plants. Sometimes the leaves will turn a gray brown with a phosphorus deficiency and you may mistake this for a fungal infestation. Look for the color change to be at the leaf tips with a phosphorus deficiency where as a fungal infestation will be all over the leaf in a more random pattern. Fungi can develop when water is allowed to remain on the leaves if you mist your plants or they are growing outdoors. Cold water can also be a cause of spotting. Use room temperature water when watering and misting. You will notice very poor flowering and fruiting if you have a phosphorus deficiency.

Phosphorus Deficiency – can occur in cold, wet or very acidic (below pH5) soils; also very alkaline soils (above pH 7.3). You will need to adjust the pH if it is below 5 or above 7.3 since no matter how much fertilizer you add it won’t be available to plants at those extreme pH’s. You should also consider potting up your plants with a pH problem the new soil will be a quick fix but you should still adjust the pH so the problem does not come back.

Bone meal is a good organic source of phosphorus and you can add this to a soil mix.

Good Growing
Dr. E.R. Myers

7/1/11

Nutrient Basics – Nitrogen

After reading this post, be sure to see how different forms of nitrogen affect pH (LINK)
Nitrogen (N) is a vital nutrient for all plants and it should be made available to plants in all stages of growth, although it should be given in lesser amounts during flowering. It is always listed as a percentage of every fertilizer as the first number. For example, a fertilizer listed as 5-1-2 would contain 5% nitrogen. Nitrogen is needed in all organisms as part of their DNA, it is also needed in many enzymes which regulate all metabolic activity in plant cells. Nitrogen will promote increases in stem and leaf growth and causes leaves to have dark green growth.

Sign of a Nitrogen Deficiency -- Plants will exhibit slow growth and will be stunted. If the problem is not corrected yield will be significantly reduced. The first thing you will notice is that older leaves become yellow (chlorotic). Nitrogen deficient plants will exhibit uniform light green to yellow color on older leaves, these leaves may die and drop. This color change will begin at the tips of leaves at the bottom of plant especially older leaves and the color change / yellowing gradually spreads up the plant to the top. Please note that many plants will exhibit these symptoms during flowering which is normal.

Nitrogen Deficiency Causes -- You can get a deficiency in fast growing crops, so if you are growing a plant that grows fast feed it a lot of nitrogen (never more than recommended by the manufacture!). You will also get a deficiency if you grow in very sandy soils (sand promotes good drainage but holds no nutrients for plants) or if you grow plants in soils with low in organic material (See compost link). Also, excessively wet soils and high or low pH can cause nitrogen deficiency. After you check the pH and adjust it to your plants optimal pH you can add Nitrogen fertilizer. The actual number is not so important as making sure the first number is the highest.

Nitrogen Toxicity is possible, so never over do it! With nitrogen toxicity leaves are often dark green and in the early stages plants are abundant with foliage. Eventually leaves will dry and begin to fall off. If you think you killed your plants by over doing nitrogen check and see if the root system is under developed or deteriorated, this is a sure sign you added too much nitrogen.

Organic sources of nitrogen are best in my opinion, you can get nitrogen in blood meal, most guanos manures and for free in urine. One cup of urine per gallon is a free source of nitrogen.

Remember though that if you are going to flower or fruit your plants you want to reduce the nitrogen percentage and have phosphorus (the second number in fertilizers) be the highest… Too much nitrogen delays flowering. Plants should be allowed to become ALMOST nitrogen-deficient late in flowering so that it does not inhibit flowering and I have read low nitrogen late in flowering can increase fruit flavor.

Good Growing,
Dr. E.R. Myers

6/27/11

Setting up a closet grow space -1


I have written about setting up a grow space before (Set up 1 and Set up 2  and Set up 3)
The first ting you should do I think is put plastic down on the floor if you are going to grow indoors. I like to use a closet so that I can control the light cycle. You can also use a grow tent  if you don’t have a spare closet. However, my main grow area at my college is open to the sky via windors/skylights and I use a 600 W HPS as supplemental light for my tropical plants. No matter what light cycle I put the 600 W light on the plants follow the suns cycle. After you put down the plastic you should go inside your grow area and look for light leaks…. Tiny little holes. Wait a minute or three with the door closed for your eyes to adjust and then look for any light leaks. You can take a marker in with you and mark where you see light and then seal the area better where the marks are.

The reason you need plastic is because plants need water, and growing indoors means you have to water them and humans make mistakes (water will spill). Water in carpet like I am showing here will 1) stain the carpet and more importantly 2) can lead to mold growth. Neither is recommending for good growing.

Measure the closet or grow area and if there are walls (you are not growing in the middle of a room for example) then add an inch or two to the length and width. You will want some over lap so that you can tape the plastic to the wall. You do NOT want the plastic to be a few inches short since this can mean dirt and water can get under the plastic to make a great environment for mold growth.
Once you have plastic on the floor and have checked for light leaks, it is time to hang electrical stuff above plants if possible. I hope everyone knows water and electricity do not mix.

Good Growing
Dr. E.R. Myers

6/15/11

Germinating Media


In a previous post  I compared a soil mixture to rockwool and starter plugs to see which was the best for germination. I found my soil mix was the best, but I really like and use the starter plugs a lot. Here I continue looking at seed germination.
Please read my post on how to speed up germination too
Growing Media, or Germinating Media is plural for Growing Medium or Germinating Medium, This is the material in which the seed is placed to germinate and begin to grow. Of the various growing media, you will need to select the medium that is best for your specific plant and growing environment.
Listed here are some of the options that are widely available for the gardener.

Vermiculite is expanded mica. It can retain a large volume of water for long periods of time. Although it contains a high level of magnesium and potassium and can hold nutrients and is good for aeration, it is not often used by itself I would sugges mixing it with perilite or soil in a final mixture for germinating seeds.

Perilite is a volcanic glass. It holds water on its surface but does not allow much absorption. It has no elements needed for plant growth and does not hold nutrients well. It does promote good aeration , stays cool and is a very good ingredient as part of a growing or germination medium.

Sand can be a good choice for root cuttings but is a bit too heavy for germinating seeds and can dry out quickly since  it does not hold water, nor nutrients.  I would not recommend it for germinating seeds but I do add it to most of my soil mixes to promote aeration.

Garden soil can be good for plants to grow in but in most areas will not offer the optimal conditions for germinating seeds because it does not allow for proper aeration and drainage for seeds. Also, it is not sterile. You can sterilization it (bake it in a pan at 300 degrees for 30 minutes) but I would suggest you sue a soil mix from HTGSupply.com with vermiculate, perlite, peat moss etc. to germinate seeds. There are many seed germination mixes available from HTGSupply.com where the work of mixing has been done for you.

Starter plugs – my favorite medium for germination at the moment is the starter plugs. They are made from tree bark provide some nutrients to the seedlings and are low mess and make transplanting easy.

Good Growing,
Dr. E.R. Myers

6/7/11

Grow Methods- Using a Screen - Sea of Green

Please be sure to see my second post about using a screen after you read this....
You can increase the growth area by training your plants, this can be good if growing in small spaces.
You can use a screen to maximze plant growth, especially in areas with a low height.  The screen should be set about 1-2 feet above the planting medium, if possible. There are two purposes for that gap. First, you have to get your hands underneath the screen in order to handle the plant shoots and to water the plants. Second, there needs to be sufficient space for the plant to branch. Branching is essential to Screen training. Some growers prefer shorter gaps for smaller lights, as little as 4-6" between screen and plants when using fluorescent lights is ok.
Note that the screen does not have to be absolutely flat, and there are good arguments for bending the screen to match the curvature of the light field. I think most growers have tall plants on the outer edge of the grow area and shorter plants in the middle so you can set your screen up like this if you wish.
This type of method of growth is great for clones. Clones are set under the screen at a density of about 1 plant per sq. ft. Experience in using the method with various types of plants may result in more or fewer plants, but 1 per ft. is a good starting point. Note that plant density is much lower than for a normal or more traditional  plant growth method That means fewer clones to manage and fewer plants to be cloned. One 8 site clone bucket could supply you with all the clones you need.
The clones are established and kept on 24 hrs or 18/6 until they show new vegetative growth. About the time where the growing tips penetrate a few inches above the screen, say at two weeks, the lights are switched to a 12 hour dark period if you are growing plants that produce in the fall. The plants will continue to grow, filling the screen with growth. At a density of 1 plant per ft., it usually works out that the plants stop and "crown off" just as the screen is filled.  Note that this timing method is not universal. Different plants may require more vegetative growth, or perhaps even less. My advice is to start by flowering asap the first time, because overgrowth of plants will not increase yields.
Training really isn't difficult. With a limber plant I usually let the shoots grow vertically above the screen and then pull and bend them under the wire re-orienting the stem horizontally under the screen to line up bud/flower sites with screen holes. You don't have to tie anything down, as the upward pressure of the stem will hold the foliage to the screen, but some growers like to tie off stems to the screen during the early phases of screen filling.
Some plants have brittle stems, and are difficult to train. It is possible to bend a stem by crushing it lightly at the bend. So long as the vessels in the plant that carry fluids aren't damaged too much, the shoot will heal and be just. It may also be possible to top brittle plants under the screen, so that the future growth will be in several, more slender shoots.
The second pruning step occurs during and after the screen is filled. All growth under the screen must now be clipped off. Shaded growth quickly shrivels and dies, leaving ideal growth mediums for mold. Excess leaves and shoots should be clipped close to the stem, to avoid leaving stumps as mold sites. Subsequent pruning is really limited once the plant starts flowering and stops growing.

Click here to see my second post about using a screen....

Click here to read a post comparing SCROG to a traditional grow method

Good Growing
Dr. E.R. Myers


6/1/11

E-mail - The Standards Questions about LED's

Good Afternoon Doc,
Perhaps you can help me. I am considering starting an indoor organic garden. I hear many sides to these new LED systems being more efficient in power and yields. I am considering buying your recommended 300 Watt High Powered Tri-Band LED Grow Light. How does it compare to this 357 Magnum LED who claims he has 119 x 3W Bridgelux Diodes that only consume "180W" and are superior to any other LED system on the market. Why does this sound so ridicules and how is it possible so many people say conflicting statements? The companies are like children bashing each others' claims. I tried doing sufficient research but have been unable to find a superior legitimate LED growing system for a plant's complete life cycle. Are there transformers out there changing the game? What makes one different from the other. What are the most important features to look for?
Another grower says the 4 wavelengths is old technology.
Can you please give me your honest non-biased input. I am considering growing in a 4x4 area in a dark corner of a room.

Hi,

As you may know, plants absorb light energy in certain wavelengths. To put it simply, wavelengths are seen by humans as colors, and the two most important colors (and indeed essential for growth) are red and blue wavelengths. These wavelengths are measured in nanometers (nm). HOWEVER, what we see as red, is not always in the exact best wavelength for plants to use. For example, if a plant absorbs red at 660nm and that makes it grow the best, our eyes would not be able to tell if a red LED was really 650nm or 670nm. Here is some important information, the cheapest LED’s are one’s that don't work as well or at all for plant growth because the emit what looks red to our eyes but is not the actual wavelength that is best for plants.
The problem, or benefit of LED"s is that they can emit light in such a specific wavelength, where as an HPS or MH emits light in all the wavelengths from red to yellow orange blue etc.. This means if you get the RIGHT LED you are saving energy by only using only the optimal wavelength of red, where as if you get the WRONG, CHEAP LED you are wasting time by not growing plants in the best environment.
I have never had the opportunity to test any of the lights, other than the one's you mentioned from HTGSupply.com. I do know all Tri-Band lights work great in all stages of plant growth, I have shown this in many blog posts. The Tri-Bands are emitting red and blue in the RIGHT wavelength. You might be able to get by with the 120W starship light, but the 300W will be good for a 4x4 area.
Good Growing,
Dr. E.R. Myers

5/26/11

E-mail – Light Problem During Flowering

Hey Doc,
I made a big mistake and I was wondering if I can do anything to fix it. I added a 120 W LED to my grow area which had a 400 W HPS, in order to increase the number of plants and the yield of plants. However, I only had the HPS on a timer, the LED was on 24hrs a day. I had a multiple outlet extension cord and instead of having the extension cord on a timer I just had one light. This happened for a week in about the third week of flowering. The plants have slowed their flowering. Any help would be great.

Well, other than a time machine there is not much you can do. The plants should recover and start flowering again, but you will definitely need more time than normal until the flowers/fruit are done. Keep the plants on 12/12 until they are done. If you are growing male or female plants you will also have to watch for the plants to become hermaphrodites. Sorry I can’t be more help. I will post this on the blog as a lessoned learned

Good Growing
Dr. E.R. Myers

5/16/11

Get Ready for Outdoor Growing III Hardening off

Please see my post on hardening off, before you move your plants from  their indoor grow area to the outdoors, it could save you a lot of hassle and increase yields.

Although it sounds silly, plants that are grown indoors are not able to handle the sun.  Sure I have said the sun is the best source of energy for plants (intense and free).  However, the indoor lights you get from HTGSupply.com are great for growing, but they don't have UV radiation like the sun, or all the other types of energy that come from the sun.  You need to gradually get your plants used to the intense UV and other types of energy that are part of the light energy plants need that comes from the sun.  You should do this over a few days so that they are not stressed out and grow slowly, or even die. 

How to get your plants ready for the sun.

Good Growing,
Dr. E.R. Myers

5/11/11

Get Ready for Outdoor Growing II SOIL

Once you start your seeds you need to make sure the soil where you are going to grow your plants is suitable. If not there are countless soil amendments from HTGSupply.com that can make sure your outdoor garden thrives as well as your indoor.

First thing I would do is see what your soil is made up of. Basically soil is made up of four things, sand, silt clay and organic matter. An easy way to test this is to get an empty olive or pickle jar, put some soil from where you will grow in the jar about 1/3 full, put a drop of dish soap in the jar (to help particles separate) and then fill the jar to the ¾ mark with tap water. Put on the lid and shake vigorously. Let the jar sit over night.

In the am, you should notice different layers. The bottom layer will be sand, the middle silt and the top whitish layer is clay. You may have small bits of ‘things’ on top of the clay, that is organic matter. Also, if the water above the soil is dark like tea, that too means you have some organic matter. Measure the total height of the dirt, then divide the total height by the height of each type of particle. The number you get is the percentage of each particle type


EXAMPLE. You have 6 inches of total soil. If you have 4 inches of sand, 1.5 inches of silt and 0.5 inches of clay you divided 4/6 and 1.5/6 and 0.5/6 you have 66.6% sand, 25% silt and 8% clay. This soil would need Coir or some other form of organic matter like compost.
I say this because if you have mostly sand the soil will tend to dry out so you will want to increase water retention. If you have mostly clay, you could add organic matter like coir which helps drainage, but you can also add sand, perlite or vermiculite. With clay (also called heavy soils) you need to increase drainage and help the roots to grow.  If you have near equal parts of sand and clay with some organic matter, you are ready to plant as is.

Another really cheap soil amendment is lime. You can get a 50lb bag for a few dollars and it makes the soil pH great for plants and will add Ca and Mg too.

Good Growing
Dr. E.R. Myers

5/7/11

Get Ready for Ourdoor Growing - I Starting Seeds

There is an article about extending the growing season outdoors with your indoor hobby under "education pages" on HTGSupply.com's web page, but I want to expand on it in the next few posts as we prepare and plant our outdoor gardens. 
We all love to grow indoors, but there is no better light source than the sun, no deeper pot than the soil, and no cheaper water than rain.  Why not expand your indoor hobby outdoors?

First, what you want to do is start a lot of seeds.  I really like the starter plugs, they are environmentally friendly (made from composted tree bark which is renewable) they have a preformed hole for your seeds and don't have the pH problems of Rockwool.  They are a lot cleaner than dirt and have some nutrients in them so they get your seedlings off to a great start.  Also, they make potting up a snap, with minimal root damage.  You just push the plug up from the bottom and plop it into a bigger pot or into your outdoor garden, simple as that.  It is a good idea to apply some fertilizer after potting up.
Next, read my post on ways to speed up the growth cycle starting with seedlings.
Good Growing,
Dr. E.R. Myers


5/1/11

E-mail - Flowering with Different Sized (Height) Plants

Hello Dr. Myers,
     I am using the T5 4bulb 2,000 Lumen that I purchased from HTGSupply.com , in the flowering stage I have 1 plant that is 2 feet taller then the others and it is too thick to really bend it.  If I have the light that much higher I know the other plants arent getting enough or will take longer to flower etc.
Is there a way to relocate the other plant someplace or set it to the side, stop the flowering and then restart the flowering later?

Hello,
You have a few options.
You could try to just bend the very top of the plant if it is possible, this will stop vertical growth even if you just bend the top couple nodes... Be careful not to break the top off. If you have a two foot difference this might not solve your problem now, but in the future if this begins to happen, bend the plant that is growing taller to keep it around the same height as the others... use this as a learning experience.

Second, you could hang the light at an angle, lower on the end with the short plants, taller over the high plant so that it is as close as possible to all plants. Third, you could try putting the tall plant on its side, this will take up a lot of horizontal room, and may make watering it a hassle, but will allow you to keep the light close to all plants. What might be easiest, you could put blocks or some sturdy object UNDER the short plants to raise them to the height of the tall plant, and then remove the blocks as the other plants grow taller.
You could also try a new trick I am working on. If you are EARLY into flowering, you could cut the top 4-5 nodes off the plant and turn the plant top into a clone. You know it is the type of flower you want already so this way you'd turn one tall plant into two plants. If you are more than a few weeks into flowering, you might not have success with the clone, and just end up cutting the top of your plant off, which will also solve your height problem, but not in a good way.
You could also do as you said, move the tall plant somewhere else, put it back on 18 hrs light and give it a good dose of high N fertilizer to get it back into vegetative. However, it will start to grow tall again if you do this, so you may need to put it on its side when you flower it again, or turn it into a mother plant and put its clones in your flowering area.

I hope one of these works for you!
Good Growing
Dr. E.R. Myers

4/20/11

E-mail - New Light for a Small Closet

Hi Doc

I’m a new grower I’m using simple 4' fluorescents right now to get my plants going, but i want to get a better light to finish veg. and flowering stages. I ont want to spend a whole lot of money. My grow room closet is small 3 1/2' by 4 1/2'with just 2 plants for now. Can you tell me what kind of light cpf/hps or mh and what watt would Be best for over all growth and flowering for the best price.

Hi, I too started out with the 4’ shop lights, they work but you will see a world of difference if you move up to a 250 watt HPS. (I think the single best light to use is an HPS) If you have a tall closet, you could use a 400 W hps, or if you are willing to vent the heat out of the closet.

You can always try a Tri-Band LED from HTGSupply.com too.  If you only want to grow two plants, a 90 W UFO LED will be fine, you can use a 120W or 300W if you want to grow more plants.

 If you do go with the HPS, I”d still start the plants under your fluorescent lights for 2-3 weeks, then switch to the HPS. You will notice that most plants tend to stretch (grow tall with long space between nodes) when they are placed under an HPS (this is due to the excess of red and yellow light). So you should also get some ties to tie down your plants. Simply bend over the tops a bit (careful not to break off the top) this will keep your plants from growing too tall with long internodes, and will have promote bushy growth.

Good Growing,
Dr. E.R. Myers

4/16/11

Test for the Best Medium for Seed Germination


I did a little comparison of seed germination between three mediums: soil, Rockwool and seed starter plugs. Years ago, I always used Rockwool, I liked the lack of mess, the ease of transplanting, and ease of planting, just put a seed in the hole and you’re done. I do not like that it is not a renewable resource however. There can also be problems with pH depending on what species of plant you are growing. The seed starter plugs that are preformed have all the same benefits minus the pH problem, plus they are renewable. And of course, soil is what plants evolved to germinate in, and it is my medium of choice, with some variations so I gave that a try to.

Soil seems to be the best thing to germinate seeds in. the seeds germinated quicker, and grew as fast as either of the other two mediums. However, it is messy, and I have not tried to pot up   the seedlings yet, so there is the possibility of damaging the seedlings when I try to dig them out. The Rockwool was the worst, to say the least I was disappointed. I don’t know why I liked it so much. For me this just shows you need to try new things to see if you can improve what you are doing. The germination time was about the same for all plants, but the Rockwool seedlings did not grow well compared to those in the starter plugs or soil. I think it was a pH problem as the plants just grew slower and were smaller. I think I am done with Rockwool forever. Don’t get me wrong, I am NOT giving it a thumbs down it has its uses especially in hydroponics, but I am a dirt grower for the most part. The seedlings in the starter plugs grew nearly as well as in soil, and potting up   will be a snap. The only drawback to the plugs is that for plants like basil, lettuce and others with very small seeds, you may be better off with soil since the small seeds can fall down into the hole, or may not grow well if they are placed on the top of the plug. I did grow chives (small seeds) in all three mediums so you can grow plants with small seeds in plugs, but I got 1-2 plants per plug and 3-6 in the soil, so soil is more economical with small seeds. If you have not tried the seed starter plugs, give them a try.

Good Growing
Dr. E.R. Myers