12/28/10

A Second Great LED -2


I used a grow tent again for my second test of a LED from HTGSupply.com and it turned out even better than I would have hoped. The new 2 watt bulbs really increase the light intensity and everything that I said in my first LED test about the 120 watt Tri-band is true for the 90 watt UFO (X2).  The UFO also incorporates the Tri-band technology but with two watt bulbs it is an even better light with LESS electricity usage. The next few posts will document with words and pictures my experiences
I have recommend to many people to start plants under a fluorescent light as it promotes short node length and good vegetative growth with its high blue light output. With the big bulbs (T-8 and T-12) I recommend cool white for its high Kelvin rating  and the blue bulbs for the T-5 HO. I have propagated cuttings under an LED and started seeds with my first LED test, but there is no reason not to use fluorescents if you have them, as I do.

I was happy to see that at the end of one week both lights had induced flowering in the cherry tomato plants. The basil and Coleus were smaller and younger and did not begin to flower in the first week. Remember that the LED is using 90 watts and the 4 bulb T-5 is using around 204 watts.
Good Growing,
Dr. E.R. Myers

12/24/10

Merry Christmas (cactus)


This is a Christmas cactus that my grandfather gave me as a cutting. (There may be some genetic basis for my joy of growing). There are several species all in the genus (Schlumbergera) and native to the South American tropics. The green, flattened, leaf-like structures that make up the majority of a Christmas cactus are actually modified stem segments called cladodes. In most cacti, the leaves have been modified into spines which have many different functions for the plant, or as in the Christmas cactus, the leaves / spines are absent.

The plants flower around the winter solstice (Christmas time) because like with many plants the longer period of darkness, not the length of light, signals the flowering times. In fact many of our favorite holiday flowers are "short-day" plants meaning they require at least 12 hours of uninterrupted darkness to stimulate flowering

You should never over water a plant but Christmas cactus like to be moist, so water as soon as the top of the soil is dry. To add more humidity around a plant that is growing in a dry winter home atmosphere, place the pot on a tray of pebbles and keep the pebbles moist. Christmas cacti grow well in a bright location out of direct sunlight. Apply a general fertilizer (like 10-10-10) every month. You could use a higher flowering fertilizer (high in phosphorus) starting in September to maximize flowering.

Good Growing,
Dr. E.R. Myers

12/21/10

Cuttings with LED Lighting


I decided to try taking cuttings of rosemary and try out Juicy Roots and see if there is a difference when the cuttings are put under fluorescents vs. LED. I took 6 cuttings and put half under a big tube fluorescent light and the others in the grow tent with the UFO. You can see with your own eyes the results (below). Now with such a small sample size this is certainly not scientific, but my goal was to test a LED with cuttings and I can now recommend LED’s from HTGSupply.com for growing plants and starting cuttings and as you will see in the next few posts, flowering/fruit production. I would have advised anyone to put the cuttings under a dome but I did not. Learn from my absent minded mistakes, you will greatly increase your cutting success if you keep the humidity high for your cuttings until roots develop.

Good Growing,
Dr. E.R. Myers

12/17/10

A Second GREAT LED- UFO - 1

The next posts follow my second use of an LED as a stand alone light for plant growth

As I said in my first test of a LED  I have gotten many E-mail's asking what I think about LED's for plant growth. The use of LED’s in indoor growing is on the rise. As before I will be growing plants (Tomato, basil and rosemary this time) in a grow tent but this time I am using a UFO LED From HTGSupply.com. I am happy to report that this LED is even BETTER than I expected, I am using a 2 watt bulb version. Of course I will show you the pictures to prove it. I can not say you will get the same results with all LED lights no matter the wattage. I know HTGSupply.com has done a lot of research and this is a proven LED that they developed specifically with photosynthesis in mind. Many of you know that unfortunately the easiest (cheapest) to produce LED that emit blue and red colors (to human eyes) are not in the optimal wavelength (color) that most plants need to drive photosynthesis.
REMEMBER: Not all LED's are the same!
Cost is a factor in all purchases and as you may know LED lights are an energy efficient light source. This means you will pay less on your electricity bill each month, forever. Energy efficiency also means there is less heat as a by product. With less heat, growing in small spaces is easier and you need less electricity and equipment to remove heat. And, LED's last for years.  You should replace an MH bulb yearly and a HPS bulb every 2-3 years (LINK how long bulbs last) or you will have a large loss in light output and yield. An LED will not loose light intensity for thousands more hours than an HPS so it lasts you years longer. Keep that in mind if you are going to grow for a long time.

THE UFO LED from HTGSupply.com
Good Growing,
Dr. E.R. Myers

12/14/10

Sugar Additives and Growth After Germination


If molasses benefits plants due to its sugar content, then maybe other sugars or carbohydrates added to the soil would also increase growth. I encouraged some of my students to test this hypothesis by suggesting they test the effect of adding sugars to sunflower seeds in potting soil. (Sadly, I did not have molasses the day we set up the experiments) We watered plants right after the seeds were planted. Each group watered half their plants with the additive (sugars or Fox Farm Big Bloom were tested this semester) and the other half of the plants only got tap water. We then reapplied the additive each week for three weeks until we measured plant growth. (Additives were 5ml per 1/2 L of: Coke, 5 hour energy drink, tea that had dextrose sugar and straight table sugar (sucrose). All plants were watered with tap water as needed throughout the rest of the experiment. We saw no increased growth (measured via height and biomass) in any sugar groups after three weeks. The Fox Farm group was significantly bigger in height and biomass. An interesting observation was most of the sugar additive groups had mold (no other pots had mold accept one’s that had added sugar). This mold may be related to the most important piece of data, that there was a significant reduction in percent seed germination found in groups that used sugar additives compared with those that added high phosphorus fertilizers or just tap water.  I would not recommend using sugars until your plants are larger and more established and interacting with soil organisms that are beneficial. I hypothesize that by adding sugar before the seeds germinate you are making it easier for harmful microbes that are wide spread in the environment and better adapted to take advantage of a sugary environment to dominate the soil. By adding sugar once the plant is larger and has established a relationship with beneficial microbes (already in place) the beneficials will thrive with the new food source and so will your plant. Next semester I will be sure to bring in molasses… until then, stay tuned and…

Good Growing,
Dr. E.R. Myers

12/5/10

More on Molasses - Molasses II

In my last post about molasses  (Be sure to read the comments too) I recommended you can add molasses a table spoon per gallon at any stage of the growth cycle so long as you don't get harmful bacterial or fungus.  There are a few products that contain sugar or molasses (see p.s. below) but if you want to buy straight up molasses’ look at the label before you use it and compare the nutritional information and nutrition facts – Here is the information on some molasses I have: Serving Size: 1Tbsp. (21g). Servings per Container: About 24. You can make 24 gallons with this one jar. Sodium - 65mg. The lower the sodium the better this is not good for plants so compare before you buy! All of the following are beneficial to plants and more is better when comparing brands of molasses -- Potassium - 800 mg. Total Carbohydrates - 13g, Sugars - 12g, Protein - 1g, Calcium - 2%; Iron 10%; Magnesium 15%; This brand does not have sulfur, but I recommend you do use molasses with sulfur (see comments about sulfur in previous post) A good grower will see this in not a bad fertilizer, which is not surprising being made of plants it has the molecular pieces that plant cells need for their metabolic reactions. Molasses like compost  supplies mineral nutrients essential for beneficial microorganisms to survive and thrive and molasses has lots more sugars which are an energy source for beneficials. A secret to successful organic gardening is feeding plant materials to microorganism populations in the soil/medium. There is a real benefit to soil microorganisms from organic amendments like molasses, kelp, or other plant based products since they are quickly and easily available as food to soil microorganism and/or plants. If molasses does improve growth or flowering and many say it does, then it may prove the old adage true - “Feed the soil not the plant.”

By the way, if you do see improvement with molasses you may want to grow with increased organic matter, it would be best to mix things, like coir and/or compost with soil, to create a heterogeneous environment with lots of food for the microbes. Also, pH is a crucial factor, Coir has a lower pH than soil so mixing it could improve or harm growth depending on what plant and environment you grow in. If you are going to try to grow or improve growth with organic gardening, a pH meter is a good investment.

I will have future posts about beneficial bacteria, please E-mail any comments or questions about this or other topics to me at askthedoctor@htgsupply.com anytime.

Good Growing,
Dr. E.R. Myers

P.S. Perry at HTGSupply.com reminded me that some of their products contain sugars like, Sweet Leaf, Sugar Daddy and Carbo Load. In fact, Sweet Leaf and Sugar Daddy have molasses in them.

11/28/10

E-mail -- How to use Molasses

Dr. Myers,

When is the right time to use Molasses in the growing cycle? How much should be used? I am using the Fox Farm nutrient package in soil-less mix. Do you add the Molasses to the regular nutrient feeding or add it to plain H2O that is
used in between feedings?
Hello and thanks for your question. I have not personally used molasses but there is a bit of information out there concerning molasses and/or sugar additives. Molasses is produced during the refining of white sugar from sorghum or from the juice of sugar cane. There is unsulfured molasses, but sulfur is a trace element so for plants I’d not use unsulfured molasses (Sulfur is not the most important thing so if you can only get unsulfured no biggie). Molasses is available in at least three colors/flavors light, dark and blackstrap. The degrees of color are a result of carmelation and how concentrated the molasses is. Light molasses is from the first boil of the cane, dark is a product of the second boil and blackstrap is a product of the third boil and before being sold as a plant supplement was mostly a waste product. This is the same story with coco coir it used to be a cost for a company to dispose of but now it is sold as a product. Maybe it is not so bad being green. If you find success in using molasses what a win-win; a former waste product that is sold to promote plant growth. If you are interested, I know blackstrap molasses does have another use, in brewing stouts and other dark beers.
Molasses if you break it down is a plant derived substance that contains potash, sulfur, and many trace minerals which can be limiting factors, it has a lot of carbohydrates (small carbohydrates are called sugars) which are an energy source for plants and/or soil microorganisms and in some studies the sugars act as a chelating agent, which means it will help plants to absorb nutrients that otherwise they could not.

There are studies that show the benefit of molasses is it provides sugar to the plant and/or soil microbes which will promote growth either way if nutrients are a limiting factor. I want to stress as I have in the past that if you want to improve growth the first and most importing thing is increasing the amount of light ALL your plants get, not just a few directly under the light. If the molasses provided a limiting nutrient you can apply it in any and all stages of plant growth at a tablespoon per gallon. But, read the limits of molasses below before you run to the store and buy up all the molasses.

Limits of molasses: I understand that many people think that adding molasses the last few weeks of flowering/fruit production will increase flowering, or that it might improve taste. Since the sugar will be metabolized (completely broken down) in the mitochondria of plant cells into CO2 and H2O and energy, it must be some trace mineral in molasses itself that alters flavor. I found no scientific study that showed improved taste due to added sugar. I did read one scientific study that said adding various sugars had no affect on fruit flavor good or bad.

While there certainly are benefits to using molasses, if you add the molasses (sugar) you do need to watch for unwanted species of mold or other pests growing in your soil . You are creating an all you can eat buffet, and you may get undesirable microorganisms in your medium.

I have also heard people suggest you foliar feed plants to get the benefits “right in there” the truth is the stomata or pores in leaves are designed to convey gaseous CO2 and H2O molecules and I don’t know how the sugar would move around inside the plant if it entered via the leaves. Also, since the stomata are on the under side of plants most water nutrients will wash off the plants if not sprayed on the underside. On the other hand, the roots are an organ designed to take in nutrients that are dissolved or soluble in water. Whether molasses can get into the leave or not can be debated but you can not argue that if you foliar spray molasses you are creating an environment that many harmful organisms can thrive in I would never recommend spraying sugars of any kind on leaves or flowers in any stage of growth.

I think there is a lot of truth in the school of thought that the sugars/carbohydrates in molasses actually feed the microbes in the soil, or hydroponic tank, and that this increase in microbe metabolism and its supply of available nutrients to the plant is what improves growth. Either way, it seems you can add molasses a table spoon per gallon at any stage of the growth cycle so long as you don't get harmful bacterial or fungus. I would be interested to hear if it makes a difference from any of the people that read this blog, maybe you could try using molasses on some plants and not others. The problem I read in many personal experiences with molasses on the web is that they used molasses on all plants and they were 'great', so therefore molasses is great? Nope, you don’t know if it was the molasses, genetics or the light from HTGSupply.com you are using that gave you the environment to be a good grower. A test with a control group is needed to prove it, you should use molasses in ½ the plants (that are all from the same mother plant or F1 generation hybrids at least) and compare them to the ½ you used molasses with.
That should answer the E-mail but in my next post I will continue discussing molasses in more detail, stay tuned!!

Good Growing
Dr. E.R. Myers

11/22/10

A Proven Fertilizer for Success - 1


Many of the E-mail’s I get are people asking me what fertilizer I use, or what the ‘best’ fertilizer to use is. The truth is it depends on the environment you create to grow in (Consider the medium plants are in, average temperature, high and low pH, source of water etc.) and most important what species of plant you grow. I can say that one thing that seems to be true in all cases is that organic based nutrients are beneficial and seldom harmful when used as directed. Keep in mind I have repeated a previous experiments (bottom of post) showing that adding more than the directed amount of nutrients actually SLOWS growth.

If you are starting out or want to try something different that you know will work… I like the Fox Farm products and recently I have been using a fertilizer that contains many beneficial organisms. Peace of Mind from Fox Farm

I use this indoors mixing about 1/4 cup of Peace of Mind with my soil/perlite  mixture when I potted up into 1 gallon containers. This semester my plants grew better than they have in a few semesters. This excellent growth continued even without adding more Peace of Mind as I potted up into 5 gallon buckets of soil mixture. I figured any microorganisms in the 1 gallon would grow and increase in number in the warm, moist soil waiting for them in the 5 gallon bucket. There was indeed continued good growth as the plants continued to grow for a week in vegetative and then begin to flower using my standard fertilizers. The plants had healthy looking dark green leaves through out the grow cycle (Seed to flower) where as in the past two grow cycles I had been dealing with some yellowing and necrosis as the plants began to flower. I lost one plant last semester and a few others I was worried would not make it. This semester I had none of that, which may mean I had a nutrient deficiency, or the plants had a weaken immune response and the beneficial organisms and/or nutrients helped boost the plants immune system.
I also used Peace of Mind from Fox Farm outdoors for my landscape plants. I had a great year in both growth and flowering for all the plants that I used the Peace of Mind from Fox Farm- with. The greatest example may be that the Bradford pear tree in my back yard is having a monumental year first with flowering and now in the fall fruit production. In fact it is sort of a pain, never in the 7 years I have lived here has the tree been dripping with pears as it is now. They cover the ground with the leaves and stick to your shoes so you have to watch for them. I sweep and rake them daily or face the consequences of the damn fruits squished in my shoes. There are many species of birds, squirrels, raccoon and opossum eating fruits on various day and night shifts but still so many fall to the ground and are left neglected to rot. I know comparing this tree to another in the front yard and a few around the block that did not get the fertilizer is not a scientific experiment, but I think there is a real benefit to all plants to have microorganisms living in the soil with them. After all, these organisms (plants, soil fungi and soil bacteria) evolved together and therefore why would anything be better for the expert or average Joe grower? If you want to grow ‘organic’ and be a good grower you will have to be mindful of beneficial organisms.

If you are looking for something to try, I am very happy with Peace of Mind from Fox Farm and I have used and will use again many products from Fox Farm all of which I get from HTGSupply.com.

Good Growing,
Dr. E.R. Myers

11/11/10

Day light savings, a timer and your life schedule

This year I have my home garden flowering 10 pm ‘off’ 10 am ‘on’. I like this because a couple days a week I get home at 9 and I like to unwind by watering, caring or just staring at my plants. With day light savings, I went down stairs after work and the light was OFF. Ohhh man. It took me 3 days to remember to alter the light back to my schedule and I figured this was a good topic to write about.

So, what is the best way to get your plants back on your schedule? Well, you could just leave the light at 9 pm ‘off' 9 am ‘on’, but I don’t like that. So, the second choice is deciding if you are you going to shorten a day or lengthen a night. It won’t make or break your growing but I would recommend having a longer night. I say this because as you may know plants keep track of day length with a molecule called phytochrome. There are two forms of phytochrome, light and dark. Light energy makes light phytochrome, and light phytochrome changes to dark phytochrome without light. The ratio of light to dark phtochrome molecules is what triggers a plant to flower. So, if you lengthen the day by an hour, you will have more light phytochrome than dark which may confuse the plant and if you are already stressing plants with too much nutrients, or light contamination at night etc. this added little stress might be the final straw that makes your plants have problems.

What I did is changed the on time an hour, so that the light would come back on at 10 am. This gave my plants a 13 hour ‘night’, which if anything would speed up the flowering response. Then, the next day with the lights on I moved the lights off time back an hour and now I am back to my original time of on and off.

Good Growing,
Dr. E.R. Myers

11/3/10

E-mail - Preventing Unwanted Seeds or Pollen Protection

Dear Doctor Myers,
I'm having a horrible time with my plants going to seed. My flowering room and vegetation room are separate. I don't know when or where the pollen has come from and I really don't know what to do. I will have the flower room empty very soon and can clean the room but it's lined with Mylar. How do I clean the pollen out of the whole grow room?

  Thanks for your question.  There are many reasons to prevent seeds first would be to ensure a true breeding line. To do this you will need to make sure there is no pollen (plant equivalent to sperm) in the room where you are inducing flowering. The easiest way to do this is to remove the male part of the flower (plant sex link), or male flowers or male plants, depending on the species of plant you grow. If you grow plants that have a perfect flower (male and female in same flower - like peas) you will have to remove the male part from every flower. If you have both male and female flowers on the same plant you can remove the male flowers but both of these situations you will have a hard time not getting seeds if you are not consistently and accurately checking your plants.. If you grow plants that are male and female (separate sexes) you can remove the entire male plant. A problem with plants that have separate male and female plants is that you may have a plant that is a hermaphrodite (has both flowers usually a small number of male flowers on an otherwise female plant), these hermaphrodites can be due to genetics or stress from high heat, or light getting in during the dark cycle, or poor nutrients (check for these problems in your garden as all can cause hermaphrodites)... If you think you have hermaphrodite plants, you may want to start over with different seeds to be safe.

Pollen from some plants can float in the air for days. You need to wipe down the Mylar and all surfaces in the room with a cleaner that has ammonia to kill any pollen. High temperatures and moisture can also kill pollen, so after you wipe down the room, try to have very high temperatures if you can for a couple days (leave light on with out exhaust fan for example). And spray the room with a water bottle once a day. Pollen usually is only viable for a couple days at warm temperatures.
I have written about pollination in previous posts

A carbon filter  might help cut down on pollen production, but it could also blow pollen around the grow room and make your problem worse if you have the air blowing across your plants like I have recommended in order to increase airflow and the growth rate. However, If you vent the carbon filter air outside the grow room, preferably outside the building, that might cut down on pollen.
Good Growing,
Dr. E.R. Myers

10/30/10

How to Select the Right Plant to Breed

  I would like to begin with a story about how any one can get caught up and forget what is important... I follow my own advice  about  how to breed the best plants but one thing even I forgot is to prioritize your breeding. This is especially true if you are growing for taste and or flavor. The soil or nutrients you provide your plants are important, but genetics is just as important (maybe more so) and genetics comes from breeding.    My story… I had been breeding a variety of pepper for a few generations. I followed all my own advice, picking and breeding the biggest plants but one day I realized that some peppers had that zip when I ate them, and others did not. Some of my peppers were mediocre! What had happened was that I was picking the best growing plants, not the best tasting peppers. I began to use recurrent selection, choosing only the best tasting peppers as mothers each generation. Sometimes these were not the first to flower or first to mature, but they tasted the best. I had several mother plants each breeding cycle but only kept seeds from a mother plant who I tasted and enjoyed. If you are growing things to be consumed you will have to breed several plants and then only choose from a mother that has the taste / pizzazz that you want.  I was not mindful of why I was breeding, I was just breeding the best looking plants, not the best tasting.

How to select the best plant to breed:  Use your powers of observation to select and REMOVE inferior plants throughout the growing process. Mediocrity is unacceptable. Make notes about each plant as it grows. Which one’s have longer internodes, which one’s branch the most, notice the shape of the leaves, notice the first to germinate or flower etc. You should have a primary goal of what you want, whether it is taste, yield or color, but if you can incorporate overall vigor into you plants all the better. Even if you just want spicy peppers, you should try to pick plants that are spicy AND grow vigorously and have good yield, and mature fast etc. Spicy is great but if you can include other good traits, that is the magic of being a good breeding. Through breeding you can make your plants better on many (all?) levels

How I breed plants: When I breed plants, I pick the first few seed that germinate, and the rest are disposed of. I then label the plants that are the most vigorous growers, the first to flower, the biggest flower, or the best taste etc. I choose only a percentage of plants at different stages of growth to continue in the growing process. Some seedlings don’t get potted up if they are inferior. They are sent to the compost pile. Some plants that grow slow are not allowed to flower. (Also to the compost pile). A term for this is that I am culling (the verb is cull) inferior plants and mediocre plants as they grow. If you have the seeds to grow extra plants it is worth it. I germinate seeds in small containers of coco coir or vermiculite or seedlings trays packed with soil. A tray holds over three dozen seeds. If the seeds are fresh I get 100% germination. Older seeds will have a lower germination percentage. From the 30+ seeds that germinate I pot up 20 seedlings under fluorescent lights knowing that I only have room for 10 of  those plants max. in my flowering area, (one 400 watt HPS).  I start plants under standerd house hold fluorescents and then I place the 20 plants in larger containers under a T5 HO florescent light. As they grow space gets limited, so I pick the weakest plant and I cull it. If you are growing plants with separate male and female plants you can induce flowering so you can cull the sex you don't want. When it is time to flower,  as I said, I only have 10 plants maximum under my 400 HPS . So, as the plants grow  I pick the best growing plants to induce flowering and/or breed but cull the rest. Sometimes I might put the mediocre plants outside (See starting seeds indoors) if I am doing this in spring, but they are never in the breeding population. Whatever you are breeding for, be observant, keep records and you will reap the rewards.

 If you have questions about breeding feel free to E-mail me.

The art of plant breeding comes in knowing your crop, being curious and making observations.

Good Growing,
Dr. E.R. Myers

10/23/10

E-mail - Rockwool and Seedlings

Hello Dr. Myers,

I’m using Rockwool so should I tease the Rockwool so that its covering the top of the seeds and just let the seeds push their way through or should i just leave the seeds uncovered inside of the propagation tray with the dome

I have written about Rockwool in general in a previous post about hydroponic mediums. Rockwool can hold large quantities of water and air which aids root growth and nutrient uptake. So, if it is sitting in water it should be able to keep the seeds wet enough to force germination if the seeds are just on top of the Rockwool. (See warning about seedlings and standing water below) The seeds could be put in the little holes in the cubes and left to come up on their own if they are the size of apple seeds or larger. Smaller seed could just be put on top of the Rockwool. As I have said, Rockwool is used principally in hydroponics.  However, I used to start the seeds in a tray in Rockwool cubes and then put the cubes in soil. The Rockwool like the coir plugs I use today just made it easy and mess free to start seeds. The nice thing about Rockwool is its fibrous nature also provides a good mechanical structure to hold the plant.

Hey Doc,
If I had a seedling in a Rockwool cube that I transplanted into a flood and drain system using hydroton what level should the water come to in relation to the Rockwool? Should the water line come just below the Rockwool?

Perry a manager at HTGSupply.com gave me some info. for this post since I have not used this type of system. With Rockwool, you could either have it flood and drain, or have the cubes constantly touching/sitting in water. If you have small seedlings then you may want to flood and drain because the cubes could be too saturated when sitting in water and cause root rot.
Many seedlings are just are too small to pull air into the Rockwool (it will be very saturated in standing water) but after a couple sets of true leaves most plants will be big enough to pull air into the cubes even if the cubes are sitting in water.

Good Growing,
Dr. E.R. Myers

10/16/10

E-mail - LED and cuttings I

Hello Doc,
  What is the best LED for cuttings?

Hello,
I have only tested the Tri-band light, specifically the 120 W.
I have not had cuttings under it yet, but I have grown plants from seed to flower so I assume cuttings would work under the Tri Band too. {Dear reader: Please E-mail me or post a comment if you have a good cuttings system that uses LED, with a picture I may be able to get you something from HTGSupply.com}. As I have said in past blog posts, not all LED’s are the same, some do not work very well for growing plants, I know the Tri Band does. Basically, the higher the wattage the more light output so if you have a lot of clones (in a larg area) or big mother plants go for the highest wattage LED you can afford.  I think the 120 W is a good place to start if you have a small set up.
I usually recommend using fluorescent lights with cuttings, and maybe even mother plants. A T-5 light might be a good choice, it may use more electricity, depending on how many bulbs you use, BUT it will have a lot of energy in the form of blue light which promotes vegetative growth. You may have to put the T-5 lights vertical beside a large mother plant, and have them horizontal for cuttings. I don't know if you have a separate area for mother plant and clones. If not you will want to use reflective material to bounce light around since it might be hard to have lights at the right distance from both big mother plants and small cuttings.
 I know a guy that used pieces of wood he made into a square frame to make platforms to keep all the plants at the same height. The smallest plants had three platforms, and as the plants grew, he’d take out a platform until it was just a plant in a 5 gallon container. He sometimes had to tie plants down if they grew too big, but eventually just found hybrid seeds that always grew to the right height.  He then used a light mover and had many plants growing all at the same height over a ten foot area with two 400 HPS.
If you do have big and small plants in one area an LED might be good since it has high light intensity, meaning plants can be further from the light and still get enough energy from the light to grow well. You would want to keep the cuttings a few feet away from any light as big or bigger than the 120 W Tri Band.
If you do go with T-5 make sure you get the bulbs that are blue for vegetative growth  not the red one's which are more for flowering. A T-5 will have a bit more heat than one LED, but it is tried and tested.
I hope this helps, I'd like to hear what LED you use, if you do and how it worked out.
Good Growing,
Dr. E.R. Myers

10/8/10

What Is a Hybrid?

I mentioned in a previous post about buying hybrid seeds and I want to add to that topic.  Keep in mind when if buy hybrid  seeds, Some hybrid plants are developed for specific growing conditions, so pick ones that are right for your indoor growing conditions

Plants are usually classified as open pollinated or hybrid. An open-pollinated plant is the natural offspring of out crossing plants. Heirlooms are open-pollinated plants that have been essentially unchanged for many years. What I mean is that today's heirloom tomato plant is nearly the same as a tomato from a century ago. In general, the seeds from an open-pollinated plant will produce a similar plant the next grow cycle/season. A hybrid is a combination of two different varieties of the same species. Plant breeders usually develop hybrids for specific reasons, meaning they choose specific traits from the parents and try to combine them in the hybrid offspring. Some examples would be breeding/combining plants to produce more colorful or bigger blossoms, or fruit and vegetable plants tha are more uniform in size or more disease tolerant. Since the plants are genetic combinations from two different plants, their offspring (the F2) tend to have a lot of diversity and are not always the same as the hybrid parents.

Brief Hybrid History
From what I can tell, corn was the earliest hybrid developed for commercial use in America. The use of hybrids has extended to vegetables and flowers; and more recently, rice and some other crops. Scientists conducted experiments for many years on hybridization and saw that it often resulted in superior plants.  In the 1930’s less than 1 percent of corn seed was hybrid compared to nearly 100 percent today. There must be a a benefit to growing hybrids if they are increasing in such over whelming numbers.

What Are Hybrid Seeds?
Hybrid seeds are produced by creating inbred lines with specific reliable traits and then two established inbred lines are crossed to produce first generations (F1) hybrid seeds. The hybrid seeds are prized because they produce uniform plants and also have what is termed heterosis (hybrid vigor). Heterosis can result in a large increase in yield compared to the inbred lines or lines that are out-crossing (heirlooms). What exactly causes heterosis is still unclear. Thus, hybrid seeds are produced by companies through careful pollination of two specific varieties. Normally, this highly selective plant breeding is done to bring together two traits in each of the chosen varieties so that the resulting seed has both of the traits. For example, one tomato plant may be very drought tolerant and another tomato plant produces large yields, the two plants might be cross pollinated to produce a drought tolerant tomato plant that produces a lot of tomatoes.

The down side to hybrids, as I mentioned is that if you breed/cross plants grown from hybrid seeds they typically do not produce seeds that are all the same, and often can even produce seeds that are inferior to out crossing heirloom varieties.

Though the term “hybrid seeds” is often used in relation to vegetables, any kind of plant that produces seeds can be bred into a hybrid variety.

Good Growing,
Dr. E.R. Myers

10/2/10

E-mail – High Humidity Cures

Doc, Thanks for the quick response. I'm also having a problem with humidity.  Any suggestions on how to bring it down. I have a fan to circulate the air and an exhaust fan taking air out but my humidity is still to high. Thanks for your help.
No problem I am always glad to help. High humidity usually is not a problem for plant growth but can lead to mold. I say this since high humidity won't slow down plant  growth unless it is very high, say over 80% humidity. Plants need to give off water as part of photosynthesis, so if the humidity is too high it might lead to slowed photosynthesis which can slow growth and lower yields. If you don't have mold, and never did it might not be a big problem for you. I also mentioned that many pests (aphids, soil gnats, root aphids and others) like high humidity so lowering the humidity might help people that have pest problems. High humidity is also something that really limits the life of carbon filters
The easiest thing if you can spare the space and electricity is a dehumidifier. I find that when I start using my HPS, it lowers the humidity in my grow area. Many growers only have small spaces  to grow in so maybe you don’t have room for a dehumidifier.
Do you have open water, as in a hydroponics set up or water in trays after you water the plants? If so you could try to cover the hydroponics medium to prevent some evaporation (not easy with some set ups) or drain the water trays a few minutes after you water so there is not standing water. If you don't have water in the room, the next thing to think about is that the plants put out water into the room as part of photosynthesis, so the more plants you have and the more you water them, the higher the humidity. So, you could try to water the plants a bit less, but not so much they wilt, which will stress out the plants and slow growth. Moreover, you could try running the exhaust fan longer, maybe even when the lights are out, or upgrade to a bigger fan which will move more air/water vapor out of the room. You should try to exhaust the air to the outside of the house, otherwise you are just moving the humidity around your house and not really getting rid of it. Something else to try is to put corn starch, baking soda, talcum powder or silica gel in the room, these tend to absorb moisture. You will need to replace them every month or less if you have very high humidity. I hope this helps.
Good Growing
Dr. E.R. Myers

9/28/10

Buying and Saving Seeds

Seed packets for sale at garden centers or other retail stores are often hybrid seeds (See later post about hybrid plants). Hybrid plants often grow bigger and yield more than nonhybrids. Hybrid seeds are usually more expensive due to the time and cost of breeding etc.  If you don't mind buying new seeds each grow cycle then hybrids are a good choice. Look on the seed packet to see if the label says "hybrid." The packet will also give climate recommendations for that species. (See the USDA hardiness zones under Useful Links on this blog) Some hybrid plants are developed for specific growing conditions, so pick ones that are right for your indoor growing conditions. If you use HID’s you may want to use varieties that are heat resistant for example. Growing indoors means that you can grow even tropical plants in any area or any time of year. You can grow any plant on Earth if you try. Other examples of indoor considerations are to grow dwarf varieties for growing in small spaces or early maturing varieties to help you speed up the growth cycle  which is something that might appeal to you if you are in college and are on a semester schedule.
Saving Seeds
Some good growers like to gather seeds from their plants and save them to plant the next grow cycle.   (See my post on how to store seeds) While I have suggested it may be better to buy seeds (link to buy seeds) collecting and growing seeds may be an interesting way to experiment and save money.  You should know most hybrid seeds, due to genetics, will produce inferior offspring or plants with different qualities and only a few will be the same as the original parents. With a small garden you will need some luck to get improved plants. If you want to be self sufficient you should buy heirloom seeds rather than breeding and planting seeds from a hybrid plant. If you don't want any hassle and  just want to grow good plants all the time, it's best to just buy new seeds. However, if you are curious and have a large garden or want to try crossing two hybrids together to look for new combinations of traits you can always try. If you cross two excellent varieties you should get above average plants at least. It might be good to have a second area for growing that you devote to breeding if you want to advance to the next step... that is another topic for the future.

Good Growing,
Dr. E.R. Myers


9/23/10

E-mail- Screened Enclosed Plants and Polination

Hi Dr. Myers
You have answered questions from me in the past and I do have another one.
In addition to my indoor garden, I have an outdoor vegetable garden. I just recently moved these plants inside my screen-enclosed pool area. Question: doesn't tomato, pepper,etc. rely on bees and other insects to pollinate and create the fruit ? So, if these vegetables are enclosed..... they will not ever produce fruit because insects and bees cannot get to them..... is this correct ?  Thanks in advance
Thanks for your E-mail. I am always happy to help, if I can. You have a good question, the answer is it depends if the plants are self pollinators or cross pollinators.  Self pollinators are plants that produce flowers that are usually fertilized by their own pollen, commonly when the male and female flower parts are contained within the same flower. These plants usually don't need an insect polinator.  Cross pollinators are plants with flowers that require pollen from another flower -or from another plant to produce a fertilized seed and the fruit that surrounds it. Cross pollinators commonly require the help of insects or the wind or YOU to achieve pollination.

Self-pollinated vegetables include: bush and pole beans, lima beans, chicory, endive, lettuce, most peas, and tomatoes. These plants don't need any help they will produce fruit if they get enought light and nutrients.

Wind-pollinated vegetables include: beets, chard, sweet corn, and spinach.

Insect-pollinated vegetables that won't produce fruit well in an enclosed area with out your help or insects are: cucumbers, eggplant, gourds, muskmelons, mustard, okra, parsnip, hot pepper, pumpkin, rutabaga, squashes, turnips, and watermelon.

You may want to see my post about how to collect pollen and do so for some of your pepper plants, all the flowers should produce it, and use your finger or a brush etc. and put the pollen from one flower (or better yet from one plant) into another.   Also, look at my Blog postings about how to transfer pollen.
Good Growing,
Dr. E.R.Myers

9/20/10

Terminator Genes - Keep You From Breeding Your Plants

I have talked about breeding plants, but did you know that it is now possible for corporations with biotechnology to insert genes into plants that will enable them to kill any seeds you get from breeding.  By inserting three genes into a plant Monsanto, and any other large corporation can effectively force you to buy seeds from them forever.  The art of breeding and crossing new varieties, something that human cultures have done for… well since we started cultivating plants 10,000 years before present (YBP) would be gone forever into the world of corporate profits.


How does this terminator technology work? Well, one example would be to insert three genes into a plant so that it can be sterilized at any time in the breeding program. First insert a gene into the plant that produces a toxin that kills the seedling as it begins to germinate. To keep this gene off (so it does not make the toxin), a section of DNA called a security wall is placed between the toxic gene and the gene that regulates it being on and off (sorry this is complicated stuff stick with me here). A second gene called a scissor gene is also inserted into the plant; this makes an enzyme (called recombinase) that cuts out the security wall turning the toxin gene on. A third gene makes a protein that represses the scissor gene (keeps it from making recombinase). Now as long as this third gene is active, the plant can reproduce normally. If however the third gene is activated by some chemical, say an antibiotic then as the seed grows it will release the scissors gene in all its cells including one's that form the seeds so that seeds from that plant will never germinate, thus ending the breeding line. By inserting this terminator gene group into breeding lines, the companies can continue to breed their plants, and they simply have to spray the seeds they sell with the antibiotic before the sell them guaranteeing that no one can grow a plant without getting new seeds from them.  This is sort of like a time bomb, you insert the terminator genes and breed away until you get a variety you want to sell, and then you spray the seeds with a chemical so that once the seeds grow the terminator genes are on. You will still be able to clone a plant with the terminator genes, but as I said cloned plants keep track of time so after a few generations you often see a decrease in plant growth and vigor.

This is not going on now, that I know of, but it is not science fiction either my friends. There have been court battles about this so it is possible that the terminator genes can be marketed, and theoretically could be put into any plant species.

To me, this is just another reason to support small local growers/breeders and to breed yourself, keep the plants in the hands of humans, not controlled by corporations
Good Growing,
Dr. E.R. Myers


9/13/10

Are You Wasting Money on Expensive Seeds?

Do you buy new seeds or clones everytime you grow?  Have you ever figured out how much you spend each year on this?  With a few supplies from HTGSupply.com you can clone your own plants or you could try your hand at plant breeding and pay next to nothing to continue growing... 

I have been breeding some plants for many years. I have not bought seeds for peppers, dill and many flowrers in years.  I do this 1) becasue I can (I have a Ph.D. in plant breeding) and 2) I am cheap and don't want to pay money to corporations for seeds which I can get myself and 3) I like it, it is my hobby.  However, I was traveling this summer and decided to get some new seeds to include in a breeding program.   What I have noticed is that the 'new' seeds/plants  have more vigor, they are growing faster and look healthier than 'my' plants. This observation was bitter sweet, my strain from many years of breeding was not as good as the one's I paid money for... but I have some awesome new plants to grow and cross with each other and 'my' plants.   I should say  that in the past I have also compared my plants with other people that paid good money for seeds and I won that compitation.  Buying seeds from big companies is not always going to get you the best product if you don't do your homework.
Most people (including me) can not afford to grow the thousands of plants required to establish a successful and longlived breeding program that can make lots of awesome seeds. This does not mean you should keep forking out money to the seed companies every time you grow however.  If you are curious, have a little time and want to save your seed money for other things you might want to try your hand at cloning and/or breeding.   I will be writting about the benefits of buying seeds, and or breeding and about some things that corporations can do to FORCE you to buy their seeds with terminator genes
I continue this buying seed debate in a later post about buying and saving seeds
I have written an introduction to breeding and about plant sex, and went into some breeding technques too, if anyone is interested.  I am ALWAYS happy to expand on or answer questions about past posts.  The more questions I get the better resource this blog will be, so tell a friend if you like what you see.

Good Growing,
Dr. E.R. Myers

9/6/10

E-mail - Cooling a Grow Room for Less Than 50 Bucks

Hi Doc,
I am looking to purchase a 400 hps light set from htgsupply.com and I was wondering if it would require cooling if it is left in a 12-12 cycle. I am limited in terms of cooling as I do not want to destroy my closet and am not able to drill anything. How could one go about cooling this machine for under $50 effectively?
Thanks!

Hi, The 400 is a good all purpose light, I use them myself. The answer to your question depends on the size of your closet. I also have a 400 watt in an old closet that is 8 feet high and 4 feet by 9 feet (I only grow under ½ that space at most). I have a carbon filter to blow the air around and my temperature never gets above 90F if I leave the door shut 24/7. You could use a circulation fan for far less than 50 dollars to move the heat if you don’t want to buy a carbon filter. Temperatures in the 90’s F may seem high but the temperature is in the low 70’s or less in the dark cycle so a few hours of 90F while not ideal is ok for most plants. If your closet is smaller space you will need to get some of the heat out. The easiest way is to have the door open during the lights on cycle. The best time to do this would be near the end of the light 'on' cycle when the temperature will be highest. The problem is you may forget to shut the door when say, you are not home, and the light will go off but the door will be open. (If you have irregular light and dark cycles you will have poor or no flowering/fruit). It would be ok to leave the door open for 5-15 minutes every day after the lights turn off to let all the heat out. It is good growing to have a big difference between day and night temperatures; you don't want to trap all the heat in the closet all night.


If your temperatures are in the upper 90’s or over 100F for long periods and you can’t open the door then you may need to use an exhaust fan. I say this because I had a small closet (3x3x7 feet) I used once and even a 250 Watt HPS needed to have the door open or it would go over 100F which will slow plant growth and make the plants grow tall and fall over, and flower poorly. You will need to do some minor construction, drill a hole a few inches in diameter, depending on the fan/duct you use.  Wall studs are usually  16 inches apart, if you find one, move the hole don't cut one , it may be holding up the roof. The fan and duct work will blow the heat out of the room. Since heat rises you should put the fan and duct at the top of the grow room.  Last option, if construction of a duct/fan or having the door open is not possible, you may want to use LED or fluorescent lights. You know I have tested the Tri-Band and you can get HO T-5 with flowering bulbs that are high in RED light


So, the first thing you need to do is to get a thermometer that has a minimum and a maximum reading and put it in the closet.  Take the reading at the top of the plants under the light.  Do not take the reading at the top of the closet, this will be the hottest spot, but is not where your plants are growing. If the temperature never goes above 90F at the plant tops you’re fine and have solved the problem for less than 50 dollars. If it is over 100F, and you are not growing cacti, your plants won't grow anywhere near their full potential. With temperatures in the upper 90F range or more you will need to do something to get rid of the heat like open the door, or use an exhaust fan/vent. You can get a squirrel cage from HTGSupply.com and I would recommend getting the duct and flange from them too so you know everything matches up. This option is sadly more than 50 bucks but is guaranteed. You can vent the air outside, or I like to vent it into the next room during the chilly months to use the heat more efficiently (think cheaper gas/electric bills with a warm room). I don’t grow in the room in the summer.


I would also send an E-mail to Sales@htgsupply.com, where a sales representative knows how to use all sorts of specific equipment. I just help with how to grow plants.


Good Growing,

Dr. E.R.Myers

8/26/10

Outdoor pests DEER

The biggest problem with deer is that they eat POUNDS of vegetation every day, and they like to try new things to eat, especially fawns.  One thing I have used to keep deer away from my plants and I know others that have too is a fishing line fence. The deer don’t see the fishing line and it spooks them. This fence is cheap, easy and is great if you don’t like the look of a fence or don’t want to block any sun light on your plants. This won’t work if you have very high numbers of deer and they are near starving of course.  I do know someone that used it and the deer did break the line a few times, but apparently that still spooked them, the veggies were not eaten. He just put up new line and the garden made it through the summer.
I have heard if you spread garlic powder or use milogranite deer won’t come around. However, I know that deer get spooked when there is something new in their environment, which is why it seems so many products work at first.  For exapmle, I freaked out deer with a wheel barrel for two days this summer, I put it under my apple tree in the garden and they snorted at it for ½ an hour each evening before leaving. Two days later they were eating in the garden again, not next to the wheel barrow but they were in the garden.

Something else I hear works is if you have motion sensor sprinklers; this will spook the deer repeatedly and may work all growing season. Get a sprinkler with the longest spray stream and longest sensor range. Another idea is to provide other forms of food, I know deer eat yarrow flowers so I don’t pick (weed) yarrow, I leave it for them to eat instead of my other flowers. This year with lots of apples on my apple tree the deer are not eating the bee balm or other plants that don’t have a fence, but they still are nipping the yarrow flowers

Deer like most people are creatures of habit, so if you start to deter them early you will have better luck, but once they get a taste for your garden and they like it, they will be back. Dogs, or cats can scare off deer, and of course an electric fence will work great too, a couple shocks and the deer will be conditioned to stay the hell away. Just be careful.

Good growing,
Dr. E.R. Myers

8/18/10

Pests- Snails and Slugs


I have written about some indoor pests, like aphids, root aphids, white flies, spider mitessoil/root gnats but there are others that often don’t get in your house but can be a pest outdoors. Most plants can be a meal to snails and slugs. Slugs and snails can rasp (eat) a hole in leaves or sometimes they eat everything but the veins of a leaf. In severe cases they will eat whole leaves leading you to think it was a larger animal. For a while I could not figure out what was eating my plants, it looked as if a deer had jumped the fence and eaten the plant leaving only the main stem. Problem was there were no deer tracks in the soft garden soil. Slugs generally are more active at night, so they don’t dry out and often go unseen. I had a friend once that went out to check on his garden at night with a flashlight for fun and was FREAKED out when he saw his beloved plants COVERED in dozens of slimy slugs eating away at the leaves. This was a wet year, and you too will find more slugs and snails in wet years or moist areas.

The best thing about slugs and snails is that they are easy to control. You just need to use sluggo. This is iron phosphate in pellet form which in the soil actually is a fertilizer. However, when a slug crawls over the pellets their soft bodies absorb the iron phosphate which interferes with the slugs calcium metabolism so that it stops eating and starves in a few days.  You can use as directed and even if you don't have slugs/snails it won't harm your plants and will provide some nutrients, so  if you see slugs in your garden, why not give it a try? 

If you don't use sluggo and have a random slug or snail you can control them by hand picking them off your plants and put them in salt water or soapy water or just stomp them. If you have a lot you should order some sluggo but should pluck them off with a tweezers or even chop sticks, if you use your hands you will get all slimy. You can use salt water to kill slugs but NEVER put salt on the soil, don’t get me wrong it will kill slugs, AND YOUR PLANTS. Salts make it hard for plants to take up water and nutrients so they dehydrate even in moist soil.

I have read you can surround individual plants with a copper barrier which keeps the slugs out. I’d like to hear if anyone has ever used this. I have tried egg shells and either I did not use enough or they did not work. I scattered the shells on the ground since they are supposed to cut the slugs and snails. I think you may be better off if you make a solid ring around your plants’ stem. Bonus is that eggs shells release calcium as they breakdown which is an essential nutrient for plants.

Here is my favorite  You can also use beer as a trap for slugs, Yep they come running like frat boys to free beer. You need to get a container that is deep enough so the slugs can’t climb out, put it in the ground and put in a bit ‘o’ beer. I drink Pabst in the summer myself and slugs love it too. Slugs will come crawling for any beer for meters around and then will drown in the beer. IMPORTANT If the container is not filled deep enough (several cm or inches) they will just have a drink and leave.

Good Growing
Dr. E.R. Myers

8/12/10

Speed up Flowering Outdoors


If you took my advice and started an outdoor garden early indoors or grow outdoors already or know someone who does, you may benefit if you read this.

I suggested in past posts ways to speed up the growth cycle vegetatively and  during flowering . Here is a neat trick I learned this summer to speed up flowering outdoors that maybe you can still use this summer or remember it for next. If you are growing plants that flower the end of summer i.e. in response to long nights (12 hours dark) you can speed up the flowering by placing something over the plants to fool them into thinking it is later in the season. The person I spoke with used a 5 gallon black bucket (which can be sent to your house from HTGSupply.com). You just put the bucket over the plant a couple hours before dark and take it off in the morning. Make sure first that the plant is not going to be bent and broken (you must do this when the plant is small). If the ground is uneven, make sure that you put dirt around the base so that light does not get in. Then a few hours after sun rise you take off the bucket. This will fool the plant into thinking it had a 12 hour night and it is much later in the grow season. This will speed up or start the flowering response. ONE WARNING: Do not let the direct sun hit the black bucket when it is on the plant, you will cook (kill) your plant in an hour or less. If your plants get early morning sun put the bucket on early in the evening and take it off at night and if they get late day sun, put the bucket on at night and leave it on longer in the morning.

How this works is due to the way that plants measure day length; they use a molecule called phytochrome. There are two types of phytochrome light and dark. Light (energy) from the sun or your grow light turns dark phytochrome into light phytochrome and without light, light phytochrome turns to dark. Plants that flower end of summer flower when the dark phytochrome is in a high amount. So, when you put the bucket on the plant it will have 12 hours of dark (make dark phytochrome) which will cause the plant to being to make hormones that signal it to flower. (One ‘night’ might be enough but you can do a couple more to really speed up the process)

Do this after the summer solstice the longest day of the year (around June 21 most years) and your plants will fully develop flowers sometimes weeks ahead of schedule. This works because as the days get shorter, more dark phytochrome accumulates. Normally it would take weeks to reach the critical amount of dark phytochrome but since your plants had a 12 hour (bucket) night, they have the critical amount of dark phytochrome and with the ever shortening days the dark phytochrome will stay in a high concentration and continue to signal the plant to flower. I say this because after the solstice the days get shorter so there will be less and less day light (light phytochrome).

This won’t work for light insensitive plants, or plants that will be very tall after the summer solstice, but you could use this before your plants get big and it should still speed up the flowering rate. You could also use this trick early in the summer (before the summer solstice) to see if plants have the flowering characteristics you want. You can cause your plant to flower, and then it will revert back to mostly vegetative growth until end of summer. Using a bucket to induce flowering in May or June may stress the plants and may reduce plant size, but can make sure you don’t grow any plants that have negative flowering characteristics. Anyway, I thought some of you might be able to use this trick to speed up flowering outdoors this year or next.

Good Growing,
Dr. E.R. Myers
8/6/10

8/1/10

Cloning Your Outside Plants


If you took my advice and had an outdoor garden as well as your usual indoor garden (start outdoor garden  indoors link) then hopefully you are enjoying good growing outdoors and you can now try another way to enhance your growing. Now that we are in August, your outdoor plants should be in full growth mode, maybe beginning to flower/fruit. If you want you could take some cuttings of your outdoor plants and get ready for another indoor crop over the fall/winter. This has some advantages, you know the plants qualities, male or female, red or blue petals etc. Another nice thing is that plants grown outdoors are usually bigger so you can take a few cuttings without harming your outdoor yield too much. Pruning an outdoor plant may make it branch a bit more. The draw back is that when you bring plants from the outside in, you risk bringing in pests like aphinds, white flies, root aphids, spider mites and more.  After you take the cuttings watch your outdoor plants to see if they develope an infestation.  If they have one already don't bring cuts indoors.

Another potential problem, plants tend to form roots with less success when flowering or beginning to flower, so if you are going to try this, take a few more cuts than usual since you will lose a few. The reason it is harder to get cuttings from a flowering plant is that the hormones that promote flowering often interfere with the hormones that promote root growth. If possible I would recommend removing flowers as the cells of the flowers and the tips of the branches are where hormones are produced. Depending on the type of plant species you are growing you may want to leave some small flowers since new growth (stems etc.) will come from the flowers. Keep in mind, the further the plant is into flowering the less the success you will have getting cuttings.

For cuttings, I usually recommend taking the tops/tips of growing branches with a couple of leaf nodes. I like to remove the lowest set of leaves and put rooting hormone where the leaves were growing (node) because this node where you cut the leaves is often where roots grow from. I know people that also take the lower smaller branches for cuttings. They say they get good results with cuttings. Moreover, the branches usually would lose leaves and die or at best would produce next to nothing as far as flowers or fruit, so why not use them to make a whole new plant? It might be something you want to try indoors or out.

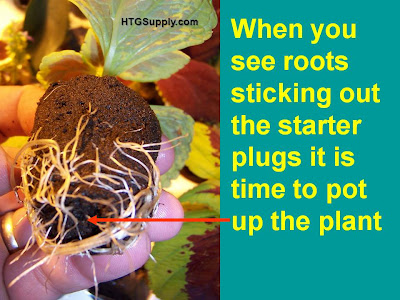
As I have said I really like to use the starter plugs from HTGSupply.com but I have used soil and soil-less rooting mediums as well. One thing I did when I made my grow shelf  for my cuttings is that I build it so that there is a slight angle away from the wall. I did this so that when I spill water it will roll off the shelf and not seep into the wall. When I take cuttings I notice that the starter plugs at the back of the shelf (high end) dry out first. You notice they start to get a lighter shade of brown as they dry, a great visual cue telling you to attend to the plants. I like the plugs because like rockwool you can let them sit in a tray with a small amount of water and the plants still have enough air around the stem to grow roots. (Roots need air and water which is why many plants don’t sprout in standing water). I have noticed with a heat mat that when the tray has some water the dome tends to be covered with condensation. The dome gets less condensation when the tray is dry, something else to key you in that you need to attend to your cuttings. I notice as over a few day that in the morning that the dome is not coverd with water which tells me the plants are drying out over night and I should give them a bit more water than the day before.  You should wipe off the done each day, you want to crease a humid environment since the plants can’t take up water without roots, but you don’t want to have a lot of areas for mold to grow, since it too likes a humid environment. I often mist the plants with a hand mister the first few days. If you have had problems with mold or stem rot in the past you may want to skip this. The idea is to keep the air humid so the plant cells in the leaves don’t dry out (and die) before the plant can form new roots to take up water.
There will be some more tips on cuttings on the next post, with more pictures.

Good Growing,
Dr. E.R. Myers


7/25/10

E-mail - Burnt Seedlings and Proper HPS Height

I just purchased a grow system from htgsupply.com --it was the hps 400w. I put my plants in my area to grow and they got burned by the light. I have plenty of ventilation for them. How far should I have the light from the plants. I just planted my seeds

Hello,
For seedlings a 400 HPS should be 2-3 feet above the plants. With larger plants with good ventilation you can have the light 1-2 feet above. Young plants in small containers will need to be protected from drying out quickly under the HPS. You should think about a thermometer with a minimum / maximum setting. If your plants are burned the temperature probably was above 100F. If it was not it might be too much fertilizer or a disease...

I have recommended a few times on the blog that seedlings are better started under fluorescents’. The T-5 high output HTGSupply.com sells are awesome, you can grow bushy, sturdy green plants a foot tall or more easily but I know they are not cheap. If you only have a few bucks get a double bulb 4 foot fluorescent light from the hardware store with cool white bulbs. With these cheap fluorescents’ keep the bulbs 1 inch from the tops of the plants and you may be able to grow plants 6 inches that are green, bushy, sturdy, and will be ready for the HPS.
Good Growing,
Dr. E.R. Myers

7/18/10

E-mail- Best 2nd Light and Stem Elongation

Hello,
I got a question about HID lighting. Currently I have a 600w hps and would like to upgrade to another 600w. I am using a Digi ballast, and would like to figure out whether or not to use a HPS/HPS combo for flowering or HPS/MH. I know MH aren’t as lumen efficient as HPS bulbs are but I also have been doing a lot of reading on how plants don’t really care about the lumens as much as the PAR watts. So before I go buy another 600w combo I’d like to figure out whether or not I'd be in my best interest to have a more mixed spectrum or just a enhanced spectrum HPS like I have now. Lastly id like to say I’m going for the maximum yield.

Hello and thank you for the question.
As usual the answer is it depends… If you are seeing any problems with stem elongation, (you are tying plants down so they don’t grow as tall, or propping them up because they are tall and lanky) I think you need an MH, or an hps/mh combo. You won’t have the light output as with an HPS but you will increase yields over your current set up for sure. If you add another hps you will have more stem elongation than you do now, the yellow/red combo so loved for flowering also increases stem elongation especially when plants are in a vegetative state. The more blue light output of an MH causes plants to have shorter stems and would actually decrease stem elongation compared to what you have now I’d imagine.

If you do not see stem elongation with your current set up I would add another hps. I say this because the yellow/red light of an HPS increases the flowering response more than the widespread light output of an MH. If you are looking for flower/fruit yield I would also go for the two HPS, again as long as you are not having a problem with stem elongation.

I think you have the right idea about PAR. An MH may have a slightly higher PAR, but the hps has more PAR in the light that induces flowering. Most other light colors (wavelengths) are given off in sufficient quantities by an HPS so a second HPS will not be a limiting factor.  Yet another reason I’d recommend an HPS, an MH bulb can lose up to 50% of its output in a year. It will take an HPS 2-3 years before it has lost 50% of its initial output. That is also something to consider, you will be buying replacement bulbs for an MH yearly if you are looking at yield.

I hope that helps, feel free to drop me a line and let me know what decision you made and how it worked out.

Good growing
Dr. E.R. Myers